Friday, December 24, 2010

Gingerbread Cookies

When I was growing up, it was tradition to bake gingerbread cookies every year around the holidays.  The first recipe I used was from my mom's big Joy of Cooking cookbook, back in the late '70s.  I used that recipe for a long time, until I moved out on my own and started trying other recipes and tinkering with the ingredients.

This is my current recipe, one that I've been using for several years now.  It has more spice and a little less sugar than most recipes, because I like the spices and I don't like things too sweet.  And of course it uses whole wheat flour instead of white.  Bake on the 9-10 minute end for soft, chewy cookies, and a minute or so longer for building structures such as gingerbread trains or houses.

Last year I baked a huge batch of gingerbread men and women.  This year, with Munchkin being 2.5 years old and wanting to be more involved in the kitchen, I decided to build a train with her.  I've never done a train before (only houses) and don't have a pattern, so I winged it free-hand.  Not too shabby, if I say so myself.  Munchkin had a blast and was tickled to see a train materialize in front of her, made of gingerbread and candy at that.  (She's currently obsessed with Thomas the Train.)  I think this will have to be an annual tradition now.  :-)

Gingerbread Cookies
makes 3 dozen men (or 1 train plus leftovers)


Ingredients:
  • 1 cup butter, room temperature
  • 1.5 cups packed brown sugar
  • 1 egg
  • 3 tablespoons orange zest
  • 2 tablespoons molasses
  • 3 cups whole wheat flour
  • 2 teaspoons baking soda
  • 4 teaspoons ground cinnamon
  • 2 teaspoons ground ginger
  • 1 teaspoon ground cloves
  • 1/2 teaspoon salt
  • confectioner's sugar (for icing)
  • milk (for icing)
Directions:
  • Cream together butter and sugar until light and fluffy.  Add the egg and blend well.  Add the orange zest and molasses and keep blending until fully incorporated.
  • In a separate bowl, sift flour, baking soda, spices and salt.
  • Gradually add the dry ingredients to the wet ingredients, mixing in one cup at a time.
  • Divide dough into two or three equal balls/logs and wrap in plastic wrap.  Refrigerate for at least 1 hour and up to overnight.
  • When ready to bake, preheat oven to 375 degrees F.
  • On a lightly floured surface, work dough until pliable (it will still be a little crumbly) and roll out to 1/4 inch thick.  Cut into shapes with a cookie cutter.  Place 2 inches apart on an ungreased cookie sheet.
  • Bake for 10 - 12 minutes.
  • Let cool completely on a cookie rack before icing.
 Icing:
  • For gingerbread men:  Place a couple cups of confectioner's sugar in a mixing bowl.  Add milk, 1 tablespoon at a time, until you reach piping consistency (like honey).  Fill a piping bag and pipe details using a #3 tip.
  • For building structures:  Place 2 pounds of confectioner's sugar in a large mixing bowl.  Add 1/2 cup milk and beat on medium-high with a hand blender.  Add additional milk as necessary to create a thick paste, kind of like a thick toothpaste.  Fill a piping bag and use a #7 or larger tip.
  • Cover bowl with any unused icing with a damp cloth or paper towel.
Here's last year's batch:

Monday, December 13, 2010

Espresso Chocolate Chip Cookies

This recipe is also not SBD-approved due to the copious amounts of butter and sugar.  But again, I used whole-wheat flour to try to make it a little more healthful.  You can tell it's made with whole-wheat flour, so if you don't like that type of texture, you can make it with regular all-purpose flour as per the original recipe.

I also used mini choco chips tonight instead of the regular ones just because that's what I had in the pantry.  This cookie would probably be delicious with white choco chips too.  Or peppermint chips.

Espresso Chocolate Chip Cookies
Adapted from this recipe.
makes 4 dozen large or 5 dozen medium cookies

Ingredients:
  • 1 cup butter, softened
  • 1 cup white sugar
  • 1 cup packed brown sugar
  • 2 eggs
  • 1 teaspoon vanilla extract
  • 2 tablespoons instant espresso dissolved in 2 tablespoons hot water
  • 3 cups whole-wheat all-purpose flour
  • 1 teaspoon baking soda
  • 1/2 teaspoon salt
  • 2 cups semisweet chocolate chips
 Directions:
  • Preheat oven to 350 degrees F.
  • Cream together the butter with both sugars until light and fluffy.  Beat in the eggs.  Then beat in the vanilla extract and dissolved espresso.
  • In a separate bowl, combine flour, baking soda, salt and chocolate chips.
  • Mix dry ingredients into wet ingredients, 1 cup at a time, until fully blended.
  • Drop by heaping teaspoonfuls onto an ungreased cookie sheet.
  • Bake for 9-10 minutes.  Let cool for 5 minutes before transferring to a wire rack.

Tuesday, December 7, 2010

Mac and Cheese

Basic mac & cheese modified to be SBD-friendly. I just used reduced-fat cheddar today, but you can mix in any other type of cheese to your liking.  It's delicious with gruyere, but I've yet to find a reduced-fat gruyere that would keep this on the SBD straight and narrow.

Mac and Cheese


Ingredients:
  • 4 tablespoons Smart Balance
  • 4 tablespoons whole wheat flour
  • 2 cups skim milk
  • Tastefully Simple Seasoned Salt to taste
  • 2 cups reduced-fat cheddar, shredded
  • 1 cup cubed ham (tonight I used leftover Honeybaked from Thanksgiving)
  • 1 pound whole wheat elbow macaroni, cooked to al dente per box instructions
  • 3 tablespoons grated parmesan
  • 3 tablespoons whole wheat panko bread crumbs
Directions:
  • Pre-heat oven to 375 degrees F.
  • In a large skillet, melt Smart Balance over medium-high heat.  Add the flour and whisk into a paste.  Continue whisking for a couple of minutes so the flour cooks and loses its raw taste
  • Add milk and seasoned salt and continue whisking until smooth.  Bring to a boil to thicken.
  • Remove from heat.  Add cheese and continue whisking until the cheese is completely melted.
  • Stir in ham and macaroni.  Pour into a baking dish.
  • In a small bowl, mix the parmesan and bread crumbs.  Sprinkle on top of mac and cheese.
  • Bake for 20 minutes.

Sunday, December 5, 2010

Oatmeal Rum Raisin Cookies

Ok, let me start off by stating the obvious: these cookies are not SBD-friendly.  I suppose you could make them so with a few substitutions (Splenda in place of sugar, Smart Balance in place of butter, etc.), but I personally don't use artificial sweeteners, and I love my butter in baked goods.  But they do have oats and whole wheat flour, that counts for something, right?  :-D

I've been making these for as long as I can remember baking cookies.  I recently added the rum twist a few years ago.

Oatmeal Rum Raisin Cookies
makes 2 dozen large or 3 dozen medium cookies


Ingredients:
  • 1/3 cup rum
  • 1 teaspoon vanilla extract
  • 1 cup raisins
  • 1/2 cup butter, room temperature
  • 1/4 cup olive oil
  • 1.5 cups packed brown sugar
  • 1 tablespoon honey
  • 2 eggs
  • 2 cups whole wheat all-purpose flour
  • 2 cups old-fashioned rolled oats
  • 1 teaspoon baking soda
  • 1 teaspoon cinnamon
  • 1/4 teaspoon salt
Directions:
  • Combine rum, vanilla extract and raisins in a small bowl.  Cover and let stand for at least 30 minutes.
  • Preheat oven to 350 degrees F.
  • In a mixing bowl, cream the butter, olive oil, sugar and honey until light and fluffy.  Add the eggs and blend until fully incorporated. Stir in the rum raisin mixture. 
  • In a separate bowl, combine flour, oats, baking soda, cinnamon and salt.
  • Add dry ingredients to wet ingredients, 1 cup at a time, and mix until well-blended.
  • Drop by (heaping) teaspoonfuls onto an un-greased cookie sheet.
  • Bake for 12-15 minutes, depending on size of cookies, or until lightly browned.
  • Remove from oven and let cool for 5 minutes before transferring to a cookie rack.
Variations:
  • Add 3/4 cup semi-sweet mini chocolate chips.
  • Add 3/4 cup chopped walnuts.

Monday, November 15, 2010

Chilly Night Chili

Gonna start breaking out my crockpot recipes, even though it's mid-Nov and was 75 degrees out today.  Maybe by doing this I'll help bring out the lower fall temps.  I'm so ready for lower temps, 75 is great for the summer, but I want my chili and hot chocolate, dammit!

I've been making this chili for years now.  I think it was originally based on a SBD recipe somewhere, but I've tweaked and modified it so much over the years that I don't remember anymore. This recipe is also easy to modify based on what you have on hand.  I've posted my "basic" recipe below, but tonight (in the photo) I made a variation based on what I had in my pantry.  Black beans instead of great northern beans, ground sirloin instead of ground turkey, and I added a chopped carrot.

I don't eat spicy food, but if you want a spicier chili, you can use cans of diced tomatoes with jalapenos or chiles (like Ro*Tel) instead of the plain ones.

Chilly Night Chili
Ingredients:

  • 1 tablespoon olive oil
  • 1 tray (1.25 lbs.) ground turkey (I used ground sirloin tonight)
  • 1 medium onion, diced
  • 1 green bell pepper, seeded and diced
  • 2 stalks celery, diced (I added a dice carrot tonight)
  • 1 can (15 oz.) pinto beans, drained
  • 1 can (15 oz.) great northern bean, drained (I had black beans but no GN beans tonight)
  • 1 can (15 oz.) red kidney beans, drained
  • 3 cans (14.5 oz.) petite diced tomatoes
  • 2 tablespoons chili powder
  • 1 teaspoon cumin
  • 1 teaspoon paprika
  • a few generous dashes of Worcestershire sauce
  • salt & pepper to taste

Directions:
  • In a skillet, heat the olive oil and brown the meat.  Drain and then place the browned meat into your crockpot.
  • Add the rest of the ingredients and cook for 4-6 hours, stirring occasionally.
This chili keeps really well in an airtight container in the fridge for up to a week.  It actually is delicious the day after, once the flavors have fused together overnight.  It freezes well too and makes good "frozen meals" to take to work on mornings when you realize you've forgotten to prep lunch the night before.

Monday, November 8, 2010

Roasted Tofu and Okra

I came across these on the KERF blog.  Two different food items, but I thought I'd put them in the same entry since the method is exactly the same, and I served them both together today.  They came out DELISH!

I never would have thought to roast tofu or okra.  I usually just use tofu in soups or stir-frys.  It really is very good roasted.  I kept it in a little too long, next time I'll reduce the baking time to 25 mins as opposed to 30 mins, which I reflected in the directions below.

In the past, I've only ever had boiled okra (per my mom), fried okra (I grew up in TN and AL), and the occasional okra in gumbo.  I'm a fan of okra in general, but when you roast it in the oven, the flavors are concentrated and are so delicious.  The seasoning keeps the outside nice and savory, while the yummy slimy insides and seeds are sweet.  MMMMM!

Roasted Tofu and Okra
Tofu recipe from here and okra recipe from here.


Ingredients:
  • 1 package (12 oz.) extra firm organic tofu, drained
  • 1 lb. fresh whole okra (even better if it's from the Farmers Market!), washed and drained
  • extra virgin olive oil
  • Tastefully Simple Seasoned Salt
Directions:
  • Preheat oven to 400 degrees F.
  • Cut the block of tofu into bite-size pieces.  (I did approx 1" x 1" x 1/2").  Put tofu in a bowl, drizzle on some olive oil and sprinkle with TSSS.  Toss to coat.  Place i n a single-layer onto a baking sheet.
  • Put the okra in a separate bowl, drizzle on some olive oil and sprinkle with TSSS.  Toss to coat.  Place in a single-layer onto a baking sheet.
  • Bake tofu for 25 minutes and okra for 20 minutes.
  • Serve immediately.

Tuesday, October 26, 2010

Goat Cheese and Spinach Stuffed Portabellas

I've been making these for years now, don't remember where I got the recipe/idea from. They are YUM.


Goat Cheese and Spinach Stuffed Portabellas


Ingredients:
  • PAM
  • 2 large portabella caps, cleaned and dried
  • Tastefully Simple Seasoned Salt
  • 1 4oz. log of goat cheese
  • 1/2 cup frozen spinach, thawed and drained
Directions:
  • Preheat oven to 350 degrees F.  Spray a baking sheet with PAM.
  • Place portabella caps upside-down (gills facing up) on baking sheet and sprinkle with TSSS.
  • In a bowl, combine goat cheese and spinach.  Stuff each portabella cap with the cheese mixture.
  • Bake in preheated oven for 15-20 minutes, until the mushroom is tender.

Thursday, October 21, 2010

Braised Pork Chops with Apples

A few years ago I was walking through Home Depot's garden center when I saw a tiny grafted ultra-dwarf Fuji apple twig in a pot.  "Grows to 6' tall" it said on the tag, "Can be kept smaller if in a pot."  Hmmm....  I love Fuji apples.  And I have a patio.  So I bought it.

The first year we got no fruit, which was as expected.  Last year we got 4 tiny, sour but flavorful apples.  This year, well, check out the picture.  The tree is about 5' tall and bore us 12 large, juicy, crunchy, uber-sweet apples!  We'd already eaten 1/2 of them by the time I got around to taking this photo.


They are awesome eaten freshly-picked off the tree.  But then I wondered, what else could I do with them?  Not enough for a pie.  And I have some pork chops in the fridge.  So why not braised pork chops with apples?  Genius!


Braised Pork Chops with Apples


Ingredients:
  • 4 boneless pork chops, all visible fat removed
  • Tastefully Simple Seasoned Salt
  • olive oil
  • 3/4 cup chicken broth 
  • 1 large fresh-from-the-patio-tree Fuji apple, peeled, cored and thinly sliced
  • Tastefully Simple Onion Onion
  • Dijon mustard
Directions:
  • Season both sides of the pork chops with TSSS.
  • In a large pan with a tablespoon of olive oil, sear the chops on both sides on medium-high heat.  Transfer the chops to a plate and set aside.
  • Reduce heat to medium and deglaze the pan with the chicken broth.  Add in the apple slices and a couple shakes of TSOO.  Cover and cook for a few minutes until the apples are tender.  Add a large dollop of Dijon mustard and stir until fully incorporated.
  • Move the cooked apples to the sides of the pan and return the pork chops to the pan.
  • Cover and braise for 10 minutes. 
  • Remove cover, flip the chops and continue braising for an additional 5-10 minutes.
  • Serve immediately.
I think next time I'll use 2 apples instead of 1, they were so yummy! Also, if you like a little sweeter flavor and are not tied to South Beach, you can use apple cider or juice in place of the chicken broth.

    Thursday, October 7, 2010

    Skillet Pasta with Chard and White Beans

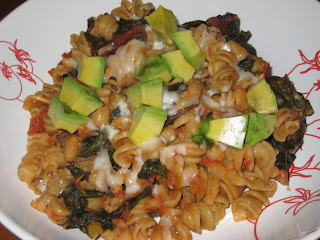
    Swiss chard -- I've had it in restaurants before, but I've never cooked with it and don't even know what to do with it.  But it was in the CSA sample box of goodies that my Moms Group organizer shared with me, and what a beautiful bunch with its different color stalks (yellow, orange, red and purple) against the dark leafy greens.  So I did a quick Google search for recipes and came across this.  I only modified the recipe because of what I had available in the kitchen (fusili pasta instead of gnocchi, diced onions instead of sliced, Tastefully Simple Garlic Garlic instead of fresh cloves, etc.).  I also added the avocado on top b/c, well, I just love avocado.  :-)  This dish turned out pretty scrumptious.

    Skillet Pasta with Chard and White Beans
    Taken from this recipe.


    Ingredients:
    • 4 cups of dry whole wheat fusili (or other shaped) pasta
    • 1 teaspoon olive oil
    • 1 smallish-medium onion, diced
    • Tastefully Simple Garlic Garlic
    • 1/2 cup water
    • 1 smallish-medium bunch of Swiss chard, washed and chopped
    • 1 can (15 oz) Great Northern Beans, drained
    • 1 can (15 oz) diced tomatoes
    • Tastefully Simple Seasoned Salt
    • 1/2 cup shredded part skim mozzarella cheese
    • 1/4 cup grated Parmesan cheese
    Directions:
    • Prepare pasta to al dente according to package instructions.  Set aside.
    • In a large skillet, sauté onion in olive oil for a couple of minutes.  Add TSGG and water and stir.  Cover and cook until the onion is soft and translucent.
    • Add Swiss chard and cook, stirring occasionally, for a few minutes until it starts to wilt.
    • Stir in beans, tomatoes and seasoned salt.  Bring to a simmer.  Cover and continue to simmer for 5 minutes.
    • Stir in pasta and sprinkle with cheeses.  Cover and continue to simmer for a few minutes until cheese is melted.  
    • Serve immediately.

    Monday, October 4, 2010

    Baked Onion Rings

    My Moms Group is thinking about joining a local CSA.  The farm kindly sent our organizer a free sample box of produce to try out, and she, in turn, kindly shared some of it with me.  One of the items I got was a giant Maui onion.  If you've never had a Maui onion before, let me tell you this sucker is SWEET!  It's great for sauteeing to put on top of steaks, and it's great as onion rings.

    But of course we all know that deep frying is not SBD-approved.  So baking it is.  This recipe yields crunchy, sweet-savory onion rings.  We ate it all straight up with dinner, no ketchup or mustard needed.  Even the toddler had seconds (and thirds).

    The key is the whole wheat panko bread crumbs.  Japanese panko style crumbs make it extra crunchy. 

    Baked Onion Rings


    Ingredients:
    • PAM
    • 1/2 cup whole wheat flour
    • 1/2 cup EggBeaters
    • 1 cup whole wheat panko bread crumbs
    • Tastefully Simple Seasoned Salt (or your favorite fry seasoning such as Old Bay, etc.)
    • A Maui onion, sliced into rings, 1/3" thick (I had a giant one, so only used 1/2 of it)
    Directions:
    • Preheat oven to 400 degrees F.
    • Spray a baking sheet with PAM.  Set aside.
    • Place the flour, EggBeaters and panko bread crumbs each in their own separate shallow bowls.  Add some seasoned salt to the panko bread crumbs and mix together.
    • Dip an onion ring into the flour, then the EggBeaters, then the seasoned bread crumbs.  Place onto baking sheet in a single layer.
    • Bake for 20 minutes until onion is soft and coating is golden brown and crunchy.

    Thursday, September 30, 2010

    Meatball-Stuffed Zucchini

    This is more of an assembly idea than an actual recipe.  I found these beautiful, large zucchini at my local Sprouts yesterday, perfect for stuffing.  But I was also in the mood for a meatball sandwich.  Thus the open-faced turkey meatball zucchini sandwich.  Too long for a title?  Okay, Meatball-Stuffed Zucchini it is, then.

    Meatball-Stuffed Zucchini


    Ingredients:
    • 4 large zucchini
    • PAM
    • a batch of turkey meatballs
    • whole wheat spaghetti, cooked to al dente per box instructions
    • shredded mozzarella
    Directions:
    • Preheat oven to 375 degrees F.
    • Wash the zucchini and cut in half, lengthwise.  Scoop out a little of the seed innards.  You don't have to scoop out a lot, since the seeds are tender and very edible.  Just enough to make a little indentation bed for the meatballs.
    • Spray a baking dish with PAM.  Place the zucchini cut-side down in the sprayed dish, in a single layer.
    • Bake for 20-25 minutes until zucchini are tender with just a slight bit of firmness.
    • On an oven-proof serving plate, make a bed of cooked spaghetti.  Place zucchini on top and fill with meatballs and sauce.  Top with shredded mozzarella. 
    • Place into oven for a few minutes until the cheese melts.
    • Serve immediately.

    Thursday, September 23, 2010

    Butternut Squash Tacos

    Let me start off by saying I got this idea from here. It is such a brilliant idea, I only wish I'd come up with it myself. And her presentation of the dish is just gorgeous. I love her blog.

    I decided to go vegetarian tonight, so I made the tacos with beans instead of meat, but you could easily use ground beef or turkey, or sliced steak, etc.  I also am not good with mixing seasonings, so I just used a packet of Lawry's taco seasoning instead of making up my own.

    I decided to copy Kath in her blog and used the butternut squash "bottoms" as the "taco shells" because the presentation is so gorgeous.  I sliced up the leftover squash "tops" -- the long thin part without seeds inside -- and boxed them up to use for something else later in the week (maybe roasted?).

    Butternut Squash Tacos
    Adapted from this recipe.


    Ingredients:
    • cooking spray
    • 2 smallish-medium butternut squash "bottoms", washed, halved and seeded
    • 1/4 onion, finely diced
    • 1 medium carrot, finely diced or sliced
    • 1 tablespoon olive oil
    • 1 can (15 oz.) red kidney beans, drained
    • 1 can (15 oz.) great northern beans, drained
    • 1 packet of taco seasoning
    • cinnamon powder
    • Tastefully Simple Seasoned Salt (or salt & pepper) to taste
    • Whatever toppings you like (today I used diced avocado and Greek yogurt)
    Directions:
    • Preheat oven to 350 degrees F.
    • Spray the bottom of a baking pan with cooking spray.  Place the butternut squash "bottoms" in the pan, cut side down.  Bake until fork-tender, usually about 30 - 40 minutes, depending on the size of your squash.
    • In the meantime, sauté the onion and carrot in olive oil until onion is translucent and carrot is soft.
    • Add the beans and taco seasoning and cook per instructions on the seasoning packet.
    • Once the squash is soft, remove from heat and flip them over (skin side down) onto a serving plate.  Sprinkle with a dash of cinnamon and Tastefully Simple Seasoned Salt.
    • Fill each squash half with the taco bean mixture and top with whatever you like.  
    • Serve immediately while still warm.
    The diced avocado and Greek yogurt I used tonight was a delicious creamy combo that was a perfect match for the beans.  You could also use guacamole, salsa, sour cream, shredded cheese, etc.

    ETA on 10/21/11: If you're pressed for time and don't have 40 minutes to bake the squash bottoms, you can put them (already halved and seeded) in a microwave-safe bowl with a couple tablespoons of water, cover and nuke on high for 5 - 7 minutes until mostly soft.  Then place the squash onto a baking sheet misted with olive oil, and bake in a pre-heated 400 degree F oven for about 15 minutes.

    Monday, September 20, 2010

    Roasted Brussels Sprouts

    I remember when I did my internship in Lille, France, I lived "on campus" and the cafeteria served Brussels sprouts about twice a week. But they were the gross over-cooked, mushy, tasteless boiled kind. I'm not a big fan of boiled anything (except eggs).

    A few years ago when I started following the South Beach Diet, I figured I'd give Brussels sprouts a second chance. But this time they were to be oven-roasted, not boiled. Wow, what a difference a technique makes! And these are so good, even the hubs loves them!


    Roasted Brussels Sprouts


    Ingredients:
    • 2 lbs. fresh Brussels sprouts, washed and drained, halved
    • 2 tablespoons olive oil
    • Tastefully Simple Seasoned Salt to taste
    • 1/4 cup grated parmesan cheese
    Directions:
    • Preheat oven to 350 degrees F.
    • Toss all the ingredients in a large bowl.  Spread the sprouts out, single layer, onto a baking sheet.
    • Roast in oven for 20 - 25 minutes.
    If you like them slightly firm (like me), aim for 20 minutes.  If you like them soft, aim for 25 minutes.  Be careful not to burn them.  Burnt Brussels sprouts = burnt cabbage = le yuck.

    Sunday, September 12, 2010

    Grilled Ginger Salmon Brochettes

    I thought I'd already posted this recipe, but after looking through my archives, I see that I have not.

    This week Henry's had fresh (not frozen!) wild (not farm-raised!) king salmon fillets on sale for $6.99/lb.  Six dollars and ninety-nine cents per pound!  That's an awesome deal!  So of course I had to snatch some up.

    Grilled Ginger Salmon Brochettes


    Ingredients:
    • 1 pound fresh wild salmon fillet, skinned, boned and cubed
    • a couple tablespoons of rice wine vinegar
    • 1 tablespoon fresh ginger, minced
    • 2 tablespoons olive oil
    • salt and freshly ground black pepper to taste
    Directions:
    • Soak some wooden skewers in water for a few minutes.  This will help prevent them from burning on the grill.
    • Place cubed salmon fillets in a mixing bowl.  Add rest of the ingredients and toss.  Let sit for 5 minutes.
    • Skewer the salmon onto the soaked skewers.  I like to use double skewers so they're easier to flip on the grill without having the salmon rotate and spin on the axis.
    • Place onto a hot grill and cook on high for a few minutes on each side.  Serve immediately.
    Eat more fish!

    Thursday, September 9, 2010

    Parmesan Sirloin Burgers

    I'm normally not a "burger-type gal," but occasionally I'll crave one.  It has to be gourmet, though, no Mickey D's or Burger King.  I do love me a good burger from Red Robin or Fatburger.  But I mostly love making them myself at home.  Burgers are SO EASY to make, and you can add just about anything to them to suit your style.  Tonight's version was a parmesan sirloin patty. YUM!
    Parmesan Sirloin Burgers


    Ingredients:

    • 1/2 lb ground sirloin
    • 1/4 cup grated parmesan cheese
    • a few generous dashes of Worcestershire sauce
    • a few generous twists of the black pepper grinder
    • Tastefully Simple Seasoned Salt to taste
    • PAM
    Directions:
    • In a large bowl, combine all the ingredients together and form into patties.
    • Spray both sides of patties with PAM.  (Or if you prefer, spray your grill instead.)
    • Place patties on grill on medium-high heat and cook to your liking.
    Tonight I happened to have a sourdough baguette from Boudin, so I formed oval patties instead of round ones, and served them on baguette slices, topped with yummy California avocado.  If you want to be strictly SBD, serve on whole wheat buns.

    Wednesday, September 8, 2010

    Off Topic - Swimming Pool Cake

    I just wanted to post a couple of photos of the cake I made for today's Moms Group's 2-year anniversary. The theme was supposed to be pool party, but it ended up being too chilly to swim. But that didn't stop me from making a pool-themed cake.

    I've been baking and decorating cakes as a hobby since I was 10 years old. It's a royal pain in the ass (too many ingredients, too many tools, and way too much clean-up at the end), but sooooooo fun and rewarding.

    This is absolutely NOT SBD legal.  The cake is a devil's food chocolate cake from this Food Network recipe.  It's absolutely delicious and I highly recommend it.  The frosting is a simple buttercream, and the "water" is Wilton's piping gel with blue food coloring added to it.  The kiddos are gingerbread cookies iced with a simple powdered-sugar-and-milk cookie icing.


    Thursday, September 2, 2010

    Vietnamese Turkey Stuffed Tomatoes

    This is based on a Vietnamese favorite of mine growing up. There are as many variations of this as there are Vietnamese moms, and even my version is not exactly like my mom's.  Traditionally this is made with ground pork, but I prefer ground turkey myself.  Serve over brown rice, or whole wheat couscous in the picture below.

    Vietnamese Turkey Stuffed Tomatoes


    Ingredients:
    • 1/4 yellow onion, finely diced
    • 2 cloves garlic, minced
    • olive oil 
    • 8 - 10 smallish-mediumish tomatoes (about 4" - 5" diameter)
    • 1 lb. ground turkey
    • fish sauce
    • freshly ground black pepper
    • 1/4 cup water
    Directions:
    • Cut a 2" hole in the top of each tomato and remove all seeds (you can leave the membranes).  Set aside.
    • In a large deep skillet, the one you'll use to eventually cook the tomatoes in (you should be able to put a lid on it without squishing the tomatoes, sautee the onion and garlic in a splash of oil, until translucent and fragrant.  Remove from heat.
    • In a large bowl, mix ground turkey with the sauteed onion and garlic.  Add fish sauce to taste (I use approx 2 tablespoons).
    • Stuff each tomato with turkey mixture.  Over-stuff a little bit to have the pretty seared meat muffin-top (okay, so maybe the words "meat" and "muffin" shouldn't be put next to each other, you get the gist).
    • In the skillet you previously used to sautee the onion and garlic, heat a couple tablespoons of olive oil on medium-high heat.
    • Place the tomatoes meat-side-down in a single layer in the skillet and sear for a couple of minutes.
    • Once the meat side is nicely seared and brown, turn down the heat to medium, add the water and a few more dashes of fish sauce.
    • Cover and simmer for about 20 minutes until the meat is thoroughly cooked and the tomatoes are nice and soft but still keep (somewhat) their shape.  (If your tomatoes are bigger, you'll need to add more cook time.)
    If you end up having extra turkey mixture after stuffing all your tomatoes, just roll them into little 1" balls and throw them into the pan next to the tomatoes.  They'll cook up nice and tender.

      Tuesday, August 31, 2010

      Whole Wheat Crepes

      I went out for crepes twice in the last two weeks.  They're a treat for me, they remind me of the semester I lived abroad in France and all the other trips I made there with family as well as for school.  I don't own a crepe maker, nor will I ever, because they're expensive little suckers.  Imagine my surprise and delight when I discovered you can make crepes in just a regular ol' pan (non-stick, preferably).

      I came across this recipe a while ago and immediately liked it above the rest because 1. it uses whole wheat flour instead of white, and 2. it looked very easy.  I made some modifications from the original recipe to make it as South Beach friendly as possible.  I haven't tried the original version.  This modified version isn't exactly like what you'd find on the streets of Paris, but it is very good and will do when the craving hits.

      The original recipe says to use a 7" skillet; I only have a 6" one and a 9" one.  The 6" pan was perfect for the Nutella-banana dessert crepes, but way too small for a ham and cheese dinner crepe, so I used the 9" pan for those. 

      Tonight's dinner featured ham and cheddar crepes (with a pile of kale chips on the side), followed by Nutella-banana rolls.  And in case you were wondering, no, Nutella is not an SBD-approved item.  But it's so good.  ;-)

      Note: cooking times are very approximate.  You'll need to experiment to see what works with your particular stove set-up and heat source.  After you make a couple, you'll get the hang of how long you'll need to cook them on each side.

      Whole Wheat Crepes
      Adapted from this recipe.


      Ingredients:
      • 3/4 cup EggBeaters
      • 2/3 cup skim milk
      • 2 tablespoons Smart Balance, melted
      • 1/4 teaspoon salt
      • 1/2 teaspoon sugar (Optional for making dessert crepes.  Omit for savory crepes.) 
      • 1/2 teaspoon vanilla extract (Optional for making dessert crepes.  Omit for savory crepes.)
      • 1/3 cup whole wheat flour
      • Your favorite filling ingredients (diced ham with shredded swiss or cheddar, leftover shredded rotisserie chicken with small chunks of brie, Nutella and banana, sliced strawberries, etc.)
      Directions:
      • With an electric blender, blend the EggBeaters, milk, Smart Balance, salt and optional sugar and vanilla for 15 seconds.
      • Sprinkle in the flour and blend for 30 seconds until smooth.
      • Cover bowl with plastic wrap and refrigerate from 1 to 4 hours.
      • When you're ready to make the crepes, place your non-stick pan over medium heat for about 30 seconds, until a light sprinkle of water on it sizzles.
      • Stir the batter well.  Pour 2 tablespoonfuls of the batter into the heated skillet and quickly swirl it around so the batter evenly coats the bottom.
      • Cook for about 1 minute until the crepe edges are golden brown and separate easily from the pan.
      • Flip it over (with your fingers or a spatula) and cook for another 30 seconds.
      • While it's cooking on the second side, quickly sprinkle your favorite filling ingredients over half of the crepe.  When it's done cooking after 30 seconds, fold the crepe in half over your filling.
      • Transfer to a plate and serve immediately.
      If you're not eating by yourself and want to be able to sit down and enjoy the meal with others, I recommend transferring each crepe as you make it onto a baking sheet and keeping them warm in a low-heat oven.  Once you've completed the batch, you can plate the warm crepes and serve them all at once.

      Bon appetit!

      Monday, August 30, 2010

      Spinach and Artichoke Orzo

      I saw this beautiful little bag of organic whole wheat orzo at the store last week and just HAD to get it.  And tonight it was the perfect accompaniment to my fresh-out-of-the-oven batch of eggplant parmesan.  I'm a happy girl.


      Spinach and Artichoke Orzo
      Made up recipe based on what was in my pantry/freezer


      Ingredients:
      • 1 cup whole wheat orzo
      • 1 can (14oz.) artichoke hearts, quartered
      • 1 handful frozen chopped spinach, thawed and drained
      • Tastefully Simple Roasted Garlic Infused Oil
      • Tastefully Simple Seasoned Salt
      • juice of 1/4 lime

      Directions:
      • Prepare the orzo to al dente, per package instructions.  Drain.
      • In a large skillet over high heat, combine the orzo with the artichokes, spinach, a couple tablespoons of oil, and seasoned salt to taste.  Toss for a few minutes until everything is piping hot.
      • Remove from heat and squeeze on some fresh lime juice. Toss.
      • Serve immediately.
      If you don't have any Tastefully Simple Roasted Garlic Infused Oil, just sautee a clove or two of crushed garlic in some olive oil before adding in the orzo and veggies.

        Tuesday, August 3, 2010

        Crunchy Buckwheat Granola

        Love love love this recipe!  Love the crunch.  Love that it's not overly sweet.  Love that it's healthy.  And oh, did I already mention that I love the crunch?  :-)  The tangy dried cranberries go perfectly with the slightly sweet crunch.  It's great as a yogurt topping, or with milk in the morning in place of your normal cereal, or just eaten straight from the container.

        I can't seem to find my 9"x9" square metal pan -- I think it's still in one of our storage boxes somewhere.  So I just used my bundt pan; worked just fine.  I could have used my sheet pan, but opted against that since it would have been a little difficult to stir thoroughly without the stuff going overboard the shallow sides.

        Crunchy Buckwheat Granola
        From this recipe here.


        Ingredients:
        • 2 cups uncooked rolled oats
        • 1/4 cup whole almonds, roughly chopped
        • 3/4 cup uncooked buckwheat groats
        • 3/4 cup raw sunflower seeds
        • 1/4 cup canola oil
        • 1/4 cup honey
        • pinch of salt
        • 1 teaspoon vanilla
        • 1/2 cup dried cranberries
        Directions:
        • Preheat oven to 325 degrees F.
        • In a large bowl, combine all the ingredients except the dried cranberries.
        • Spread loosely into a 9"x9" metal baking pan (or in this case, a bundt pan)
        • Bake for 1 hour, stirring thoroughly at 30 minutes.  (I stirred again at 45 mins.)
        • Remove from oven and stir in cranberries.
        • Stir occasionally while cooling to reduce clumping.
        • Cool completely before putting into an airtight container.
        Tip: After you add the oil, use the same measuring cup for the honey.  The residual "lube" from the oil will help the honey slide out of the measuring cup much better, no scraping required.

        Monday, August 2, 2010

        Cucumber and Mango Salad

        This salad is best made with baby/persian/pickling cucumbers and green mangoes.

        Baby/persian/pickling cucumbers because they're crunchier than regular cukes, have thinner skin, and have no seeds (well, technically they do have seeds but they're tiny and not as noticeable as the ones in regular cukes).

        Green mangoes because of the tang and crunch. Pick a mango that has dark green and red skin, but most importantly, make sure it's FIRM. 

        Cucumber and Mango Salad
        Ingredients:
        • 3 persian cucumbers, diced (about 2 cups worth)
        • 2 medium green mangoes, peeled and diced (about 2 cups' worth)
        • balsamic vinegar
        • salt & freshly ground black pepper
        Directions:
        • In a large bowl, combine the cukes, mango, and enough balsamic vinegar to liberally coat everything.
        • Add salt & freshly ground black pepper to taste.
        • Toss well and let sit in the fridge for at least 20 minutes.
        • Serve and enjoy.
        This salad keeps well in a tightly sealed container in the fridge for a couple of days, but any longer than that and it loses its crunch.  It's actually quite delicious if made the day before and left to marinate overnight in the fridge.

        Tuesday, June 8, 2010

        Crockpot Roast

        This is a spin on pot roast that's cooked in the crockpot. I've done many different variations on this, but here's tonight's version.

        Crockpot Roast


        Ingredients:
        • 2 pound chuck roast, all visible fat removed
        •  Tastefully Simple Seasoned Salt
        • olive oil
        • 5 medium carrots, thickly sliced
        • 6 medium red potatoes, cubed (omit if you are strictly following the SBD, or use sweet potatoes)
        • a few generous dashes of Worcestershire sauce
        • 2 6-oz. packages sliced mushrooms
        • 2 15-oz. cans diced tomatoes, drained, reserve 1 cup of the juice
        Directions:
        • Liberally season both sides of the chuck roast.  Heat a couple tablespoons of olive oil in a pan and sear the meat on both sides.
        • In a crockpot, place the carrots and potatoes.  Season with TSSS.
        • Place the seared meat on top of the veggies and add a few generous dashes of Worcestershire sauce.
        • Add the mushrooms, diced tomatoes and reserved juice.  Season with TSSS.
        • Cook on low heat for 8 hours.  Towards the last hour, stir the veggies with a wooden spoon.
        In the past, I've also added a large sliced onion, celery, as well as peas.

        Monday, June 7, 2010

        Ahi Tuna Sandwich

        Another way to prepare and eat fish. I love fish. :-)  The goat cheese gives this sandwich a lovely zing that goes really well with the tuna, but goat cheese is pretty mild, so you'll have to be rather generous with it.

        In hindsight, I guess I should have seared the sides of the tuna just for photo presentation purposes.  If you look closely, though, you'll see I did get a nice brown crust on the top of the fish (and on the bottom, too, I promise), if not the sides.

        Ahi Tuna Sandwich


        Ingredients:
        • Orowheat 100% whole wheat sandwich thins
        • goat cheese
        • olive oil
        • fresh Ahi tuna fillets cut into patty-size pieces
        • Tastefully Simple Seasoned Salt
        • baby spinach, washed and dried
        • tomato slices
        Directions:
        • Spread goat cheese generously (generously!) over the bottom half of each sandwich thin.
        • Place the sandwich thins in the toaster and toast until desired crispiness.  The goat cheese will soften but won't necessarily melt.
        • Heat a couple tablespoons of olive oil on medium high heat in a large pan.
        • Lightly season both sides of fillets.  Place in pan and cook 2-3 minutes on each side until fish is nicely seared on the outside and fully cooked on the inside.**
        • Place fillet patties onto the cheesed sandwich halves.  Add spinach and tomato slices and top with the other halves of the toasted sandwich thins.
        **Note: unless you are purchasing sushi-grade tuna, please cook your fish all the way through for safety reasons.  This includes all fish purchased at mainstream supermarkets.  If you like seared tuna, where the fish is raw/rare inside, you'll need to buy sushi-grade tuna at specialty stores.

        Sunday, June 6, 2010

        Sauteed Kale and Tomato

        Kale.  It's my new favorite green.  Seriously.  It's robust, flavorful, and chewy and crunchy at the same time.  I had some beautiful tomatoes today so I thought I'd sauté them up together.  I loved it.  Hubby didn't care for the tomato part, so I'll try this again another time without the tomato (maybe with mushrooms?).

        Sautéed Kale and Tomato


        Ingredients:
        • olive oil
        • 3 medium tomatoes, sliced and seeded
        • A big bunch of kale, chopped into bite-size pieces, washed and drained
        • Tastefully Simple Seasoned Salt
        • Tastefully Simple Onion Onion
        Directions:
        • In a large pan, drizzle a couple tablespoons of olive oil.
        • Add the tomato and sauté on medium-high heat until soft (approximately 5 minutes).
        • Add the kale, a few dashes of TSSS and a few dashes of TSOO. 
        • Sauté until the kale is soft but still slightly crunchy/chewy (approximately 3 minutes).
        • Serve immediately.
        We had this tonight as a side to some Simple Snapper and yams.

        Wednesday, June 2, 2010

        Roasted Pork Tenderloin

        I normally would make this with a few cloves of freshly-crushed garlic, but I don't have any on hand at the moment, so I just used garlic powder (I'm also out of Tastefully Simple Garlic Garlic - gasp!). Ghetto, I know. My apologies. :-)

        Roasted Pork Tenderloin


        Ingredients:
        • 2-3 cloves of fresh garlic, crushed (I used 1 tablespoon of garlic powder today)
        • 2-3 teaspoons of dried rosemary
        • a few dashes of Tastefully Simple Seasoned Salt
        • a couple tablespoons of olive oil
        • 1.5 lb pork tenderloin, all visible fat removed
        Directions:
        • Preheat oven to 400 degrees F.
        • In a small bowl, combine the garlic, rosemary, seasoned salt and olive oil so it forms a paste.
        • Rub the mixture all over the pork.
        • Place pork on a sheet pan and roast until a meat thermometer registers 155 degree F (45 minutes to 1 hour).
        • Let the pork rest for 15 minutes before slicing.
        I like to add veggies to the pan about 20 minutes before the end of cooking time, so they can roast alongside the pork and soak up any of the yummy juices.  Today's green of choice: Brussels sprouts.  YUM!

        Wednesday, May 26, 2010

        Simple Snapper

        I think I'd mentioned before that my favorite way to prepare light fish is just with a dash of seasoning and then pan fried on the stove. It's easy, it's quick, and it's tasty. And it adds more fish to my diet.

        Simple Snapper


        Ingredients:
        • fresh red snapper fillets (or other flaky white fish such as tilapia)
        • Tastefully Simple Seasoned Salt (or your favorite seasoning)
        • PAM
        Directions:
        • Lightly sprinkle Tastefully Simple Seasoned Salt over each side of fish fillets.  Let sit for 10 minutes.
        • Pre-heat large pan on medium-high.  Spray with PAM.
        • Cook fish (in a single-layer) for a couple minutes on each side until cooked through. If it doesn't have a nice light sear to it, turn up the heat a little bit.
        That's it.  How quick and simple (and delicious) can it get?  :-)

        Wednesday, May 12, 2010

        Turkey Meatballs

        Pasta is the quick and easy go-to meal in most households.  Made with the proper ingredients, it can be very nutritious as well as yummy.  I always use whole wheat pasta, I switched from the white stuff years ago and have never gone back.  Whole wheat or whole grain anything used to be difficult to find at the grocery store, but nowadays everyone carries at least a couple of options.

        I also like to make turkey meatballs instead of beef.  When I do use ground beef, I make sure it's from a leaner cut, like ground sirloin.  And I normally like to add extra veggies to my sauce.  Diced zucchini and carrots work really well, and also button mushrooms.  I'll just throw these into the pot while the meatballs are simmering (earlier for carrots, which take longer to soften, and in the last 15 minutes or so for zucchini or mushrooms, which cook much faster). 

        Turkey Meatballs
        This is a compilation/adaptation of different recipes I've read over the years.


        Ingredients:
        • 1 lb. ground turkey*
        • 1/4 cup whole wheat bread crumbs
        • 1/2 cup grated parmesan
        • 1 egg, beaten
        • a couple teaspoons of Tastefully Simple Italian Garlic Bread Seasoning (or any other Italian seasoning)
        • a few dashes of Worcestershire sauce
        • olive oil
        • 1 jar Trader Joe's Organic Marinara Sauce
        Directions:
        • In a large bowl, mix together the first 6 ingredients above (without the oil and marinara sauce).
        • Form into 1.5" balls.
        • In a large skillet, add a couple tablespoons of olive oil and brown the meatballs on medium-high heat, turning them a few times to make sure each side is nice and brown.
        • Once the meatballs are brown on all sides, reduce heat to low.  Add the entire jar of marinara sauce and simmer, covered, for 30 minutes.

        *Today I used a 1 lb. package of Foster Farms ground turkey.  I sometimes use a package of Jennie-O turkey, which is actually 20 oz., or 1.25 lbs., so if you use this brand, just slightly increase the amount of bread crumbs, grated parmesan and seasoning.  The single egg is still fine.

        Monday, May 10, 2010

        Roasted Garbanzo Beans

        I do apologize for my long blogging hiatus. I was also on a cooking hiatus since school got really hectic as we're rolling towards the end of the semester. We ate out way too much and I can totally feel it in my waist. :-( So even though finals are only a couple weeks away and life is as busy as ever right now, I've decided to get back to cooking and eating healthy.

        The challenge with this blog is not necessarily the cooking part, I think I've got that down, it's the cooking new foods part. I love trying new recipes and cooking methods, it's just that when I'm busy and crunched for time, I tend to fall back to my old favorites which are quick to not only think up and shop for, but to prepare as well since I don't have to research and refer to other sources. But I do have a long list of new items I want to prepare and try, so I will do my best to cycle through them on a more regular basis. :-)

        I was baking a double-batch of kale chips tonight when my mind started to wander. Hmmm, I wonder what else I can roast up to a crisp? When I opened up my pantry, I saw a lonely can of garbanzo beans (AKA chickpeas) amidst cans of black, kidney and great northern beans. So over to the computer I went to search for a recipe. Ta-Dah! Roasted Garbanzo Beans! So easy and so yummy!

        Roasted Garbanzo Beans
        Adapted from this recipe.


        Ingredients:
        • 1 (15 oz.) can of garbanzo beans, rinsed and drained
        • PAM
        • Tastefully Simple Seasoned Salt
        Directions:
        • Preheat oven to 375 degrees F.
        • Dry the garbanzo beans with a paper towel and place them onto a baking sheet in a single layer.
        • Roast in the preheated oven for 40 - 50 minutes or until golden brown and crunchy, tossing the beans with a wooden spoon every 15 minutes or so to prevent sticking.
        • When beans are nice and crunchy, remove from oven.  Spray the roasted beans very lightly with PAM and sprinkle with seasoned salt.  Toss and enjoy!
        Ok, so one can of these suckers isn't nearly enough for a family of 3 plus Grandma.  I'll need to at least double it for next time.  ;-)

          Wednesday, April 14, 2010

          Cordon Bleu-ish Chicken

          I love love love chicken cordon bleu, but the traditional recipe is soooooo heavy in calories and fat that it's a definite no-go when you're trying to eat healthy. So over the years I've developed my own version. Baked instead of fried, and sans sauce, but still very yummy. I also don't pound out my chicken breasts, but you can if you have the time.

          Cordon Bleu-ish Chicken


          Ingredients:
          • PAM
          • 4 medium chicken breasts, boneless and skinless, all visible fat removed
          • 4 deli slices of ham (I used Black Forest ham)
          • 4 deli slices of cheese (usually Swiss, but I used Provolone tonight)
          • Tastefully Simple Seasoned Salt
          Directions:
          • Preheat oven to 350 degrees F.  Spray a baking pan with PAM.
          • Butterfly the chicken breasts.  (Pound them out to 1/4" thickness if you desire.)
          • Open up the breasts and stuff each one with a folded slice of ham and a folded slice of cheese.
          • Close up the breasts and place them in the sprayed baking pan.  Sprinkle with TSSS.
          • Bake until cooked through, approximately 25-30 minutes.
          Bon appetit!

          Monday, April 12, 2010

          Miso-Glazed Sea Bass

          Fresh wild Corvina sea bass has currently been on sale at the local grocery store, so this is the 3rd week in a row we're eating it. I'm a seasonal/sale shopper. I just can't justify paying triple for something off-season, there are so many other food choices out there that it's unnecessary. If oranges aren't on sale in the summer, eat the watermelon that is. If the pork chops are full price this week, skip them and buy the sea bass that's seasonal and on sale. :-)

          I made this tonight and it was oh-so-good and oh-so-easy. You can buy miso paste in the refrigerated section at most grocery stores, usually over by the tofu or other Asian items. They come in little tubs and keep for several months in the fridge. Just make sure (if you're on the South Beach Diet) to read the labels and buy the ones with no sugar added. I don't miss the sugar because I don't need my miso to be sweet, but if you like the sweetness, you could always add your own no-calorie sweetener. It's all about being aware and being in control of what you put into your body.


          Miso-Glazed Sea Bass
          Adapted from this recipe.


          Ingredients:
          • PAM
          • 1 1/2 pound sea bass fillet, skinned and de-boned, cut into portions
          • Tastefully Simple Seasoned Salt
          • 2 tablespoons miso (white or brown, it doesn't matter, it's just taste preference)
          • juice of 1 small lime
          • water
          • freshly-ground black pepper
          Directions:
          • Preheat broiler.  Spray a baking sheet lightly with PAM.
          • Season one side of the fillets with the TSSS.  Place seasoned-side down onto the sprayed baking sheet.
          • In a small bowl, whisk together miso and lime juice.  Add water, a little bit at a time, until you get a thick drizzle (about the consistency of pancake batter).  Add freshly-ground black pepper.
          • Spoon miso mixture over the tops of the fillets.
          • Place the fish 6 - 8 inches under the broiler until it is cooked through, about 8 - 10 minutes.
          This is delicious accompanied with roasted veggies (cooked in the same oven at the same time).