Tuesday, May 29, 2012

Orange Soy Baby Back Ribs

My mom makes a yummy Asian-soy baby back rib.  I actually prefer it to barbecue-flavored ribs.  Not that I would ever turn down barbecue-flavored ribs, mind you.  And coming from Memphis, TN, I do love me some barbecue-flavored ribs.  But there's something so deliciously scrumptious about soy ribs.  As in soy sauce, not ribs made out of tofu.  Please.

My mom's ribs, though they have great flavor, always come out dry.  Almost jerky-like.  She's one of those people who likes to cook her meat to death.  Her ribs are dry.  Her chicken is dry.  Her steaks are well-done, which to me is inedible.  So I thought I'd try adapting her soy ribs to my liking - I boiled them first, then finished them off in the oven.  They are fall-off-the-bone tender with nice outside color.

I had a big, juicy navel orange on my counter today begging to be eaten, so I incorporated it into the ribs.  Delish!

Orange Soy Baby Back Ribs


Ingredients:
  • 2 to 2.5 lb. pork baby back ribs
  • 1 cup soy sauce, divided
  • 2 cloves garlic, minced
  • 1.5 teaspoons cumin powder, divided
  • water
  • zest and juice of 1 large sweet navel orange, about 1/3 cup
  • Tastefully Simple Garlic Garlic
  • 1 tablespoon honey (more if the orange is tart)
Directions:
  • Place the ribs in a large pot.  Add 3/4 cup soy sauce, minced garlic and 1 teaspoon cumin powder.  Add enough water to cover the ribs.  Bring pot to a boil, then reduce to simmer.  Cover the pot leaving a crack open and continue simmering until the ribs are tender, about 2 hours.  When they are done, transfer the ribs to a plate and discard the cooking water.
  •  Pre-heat oven to 400 degrees F.  Line a rimmed baking sheet with foil and spray with cooking spray.
  • In a small sauce pan, whisk together the remaining 1/4 cup soy sauce, 1/2 teaspoon cumin powder, the orange juice and orange zest, a few dashes of TSGG, and honey.  Bring to a boil and cook, stirring frequently, until the sauce is reduced by a third, about 10 minutes.
  • Place the ribs in a single layer onto the baking sheet.  Brush the orange soy sauce liberally over each rib and bake for 10 minutes until they get a nice brown crust.  Flip the ribs over, brush with more orange soy sauce and bake for another 10 minutes.
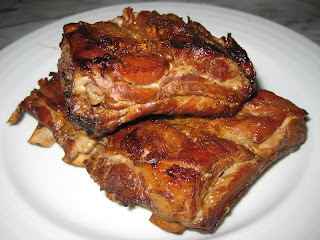
Enjoy!  We sure did.  :-D

Saturday, May 26, 2012

Pork Tenderloin Stuffed with Spinach and Mozzarella

Using up what's in the fridge again - part of a clamshell of baby spinach leaves, and some shredded mozzarella that expires tomorrow.

Pork Tenderloin Stuffed with Spinach and Mozzarella


Ingredients:
  • 2 1-lb. pork tenderloins, all visible fat removed
  • a large handful of baby spinach leaves
  • about 1/3 cup of shredded part-skim mozzarella
  • Tastefully Simple Seasoned Salt
  • Tastefully Simple Garlic Garlic
  • olive oil
Directions:
  • Pre-heat oven to 400 degrees F.  Spray a baking sheet with olive oil.
  • On a cutting board, slice each tenderloin length-wise (like you're unrolling a cinnamon bun) a few times until you get an open rectangle (okay, more of an oval) of meat that is about 1/2-inch thick.  
  • Arrange half of the spinach on top of one of the open tenderloins.  Then arrange half of the mozzarella on top of the spinach.  Roll the stuffed tenderloin up tightly and lay it seam side down onto the baking sheet.  Repeat with the second tenderloin.
  • Sprinkle each stuffed tenderloin with TSSS and TSGG.  Drizzle with olive oil and massage.
  • Roast in pre-heated oven for about 40 minutes until the internal temperature reaches 145 degrees F.  Remove from oven and let sit for 5 minutes before slicing on a diagonal.

Wednesday, May 23, 2012

Baked Zucchini

I was craving something au gratin tonight.  I had some nice zucchini from the store, but then I had second-thoughts.  Even the lighter versions of au gratin have high-ish calorie counts, and I didn't want to go there tonight.  So I decided on a simple, easy zucchini bake.  Yum yum!

I used 1/2 cup parmesan and 1/2 cup mozzarella tonight, and it was a bit much.  I've decreased the cheese amount in the recipe below, but how much you use would ultimately depend on your tastes and the size of your zucchini.

Baked Zucchini


Ingredients:
  • olive oil
  • 1/2 onion, thinly sliced
  • 4 medium zucchini, sliced into 1/4" discs.
  • a large pinch of dried basil
  • a large pinch of dried thyme
  • a small pinch of dried rosemary
  • Tastefully Simple Seasoned Salt
  • 1/3-ish cup shredded parmesan
  • 1/3-ish cup shredded part-skim mozzarella
Directions:
  • Pre-heat oven to 350 degrees F.
  • Spray a medium baking dish with olive oil.  Set aside.
  • In a small skillet, heat a tablespoon of olive oil, then add sliced onion and cook over medium heat until soft.  Pour into a large mixing bowl.
  • Add the rest of the ingredients to the mixing bowl, reserving a couple of tablespoons each of the cheeses.  Toss everything until well incorporated.  Pour the zucchini mixture into the prepared baking dish.  Bake for 30 minutes.
  • Sprinkle the remaining cheese on top and return the dish back to the oven for another 5 - 10 minutes until the cheese melts.

Monday, May 21, 2012

Off Topic - Decorated Cookies - Trains, Valentine Hearts, Leprechauns and Shamrocks, Easter Eggs ,Bunnies and Chicks, Teacher Appreciation

As some of you already know, I've been decorating cakes as a hobby since I was 10 years old.  My mom even bought me my own decorating tool caddy with, like, a dozen different tips to use, a handful of couplers, flower nails, and those oh-so-fun-to-clean piping bags.  Every so often I'd pick up a copy of the latest Wilton decorating magazine and I had a blast, it always felt good to be able to zone out in front of a blank cake canvas and get my creative juices flowing.

Nowadays, 30 years later, I still do decorate the occasional cake, but it seems like the chore of cleaning grease-based frosting from tips and couplers (at least we have disposable piping bags now, or else I'd have completely quit a long time ago) over-rides my desire for creativity.

Earlier this year, as I was planning my little one's first birthday party, I was trying to come up with a fun party favor when I came across decorated sugar cookies online.  Well, sure, I've seen lots of them before, but never gave them much thought until I decided to make some for little one's party.  The flooding part is different than frosting a cake, but the piping technique is very similar.  And royal icing, unlike buttercream, is just sugar, water and meringue powder, no grease and easy to clean!

So here's what I've done over the past 4 months.

February - Train cake and cookie favors for little one's first birthday party
Still learning about icing consistency, it was too runny but the cookies still turned out cute. Can you believe I baked and decorated 60 trains?!  Crazy first attempt at decorating cookies.  5 dozen vanilla sugar cookies.
 

February - Valentine's Day playdate; heart cookies
Much better icing consistency.  These were time consuming but so much fun!  1 dozen chocolate sugar cookies.
 

March - St. Patrick's Day playdate; leprechaun and shamrock cookies
1 dozen chocolate and 1 dozen vanilla sugar cookies.


April - Easter brunch at in-laws; bunny, baby chick and egg cookies
18 chocolate sugar cookies.


 May - Teacher Appreciation Week for big one's teachers; square and daisy cookies
1 dozen chocolate and 1 dozen vanilla sugar cookies.


That's it for now.  I'm having so much fun with this that I wish I had more time to do it more often.  I'll post more as I make more.  I need a place to keep these pictures for reference, and I can't keep up with two blogs, so they'll make the occasional appearance on here.  Thanks for bearing with me.

Tuesday, May 15, 2012

Mashed Cauliflower

A South Beach Diet staple.  This is great in place of mashed potatoes or grits.  Make sure you cook the cauliflower until it's fall-apart tender, otherwise the texture will be gritty and not creamy.  There are many versions out there, but this is how I make it.

Mashed Cauliflower


Ingredients:
  • 1 large head of cauliflower, washed and chopped
  • water
  • 1/4 to 1/2 cup nonfat milk
  • 2 tablespoons Smart Balance
  • 1/2 cup grated parmesan
  • Tastefully Simple Seasoned Salt
  • Tastefully Simple Garlic Garlic
Directions:
  • Dump the cauliflower into a large pot and add water until it covers the cauliflower.  Bring to a boil over high heat, reduce to medium and cook until it is completely soft, approx 15 - 20 minutes, depending on the amount of cauliflower and size of your cut pieces.  Drain and add the cooked cauliflower back to the pot.
  • Add 1/4 cup of milk, Smart Balance, parmesan, and TSSS and TSGG to taste.  Heat through over medium heat to melt the SB and cheese (don't scald the milk!).  Using an immersion blender, puree until creamy.  Add more milk as needed.
Note: Start out with just 1/4 cup milk, even though it might sink to the bottom and not look like enough.  You'll get a better idea of thickness after you puree the cauliflower and can add more milk afterwards if it's too thick. If you add too much milk up front, you can add a little more cheese to thicken it up a bit but it's hard to fix if it's soupy.

Thursday, May 3, 2012

Chicken with Spinach, Mozzarella and Roasted Red Peppers

Easy peasy lemon squeezy.  I did mine on the stove top instead of on the grill, making it a one-pan, one-method dish.

Also, I bought a beautiful jar of virgin unrefined coconut oil that I'm going to start cooking with, just to see what all the hype is about.  So far so good.

Chicken with Spinach, Mozzarella and Roasted Red Peppers
Adapted from this recipe.


Ingredients:
  • 1 tablespoon coconut oil
  • 4 chicken breast cutlets
  • Tastefully Simple Seasoned Salt
  • Tastefully Simple Garlic Garlic
  • a large handful of frozen spinach, thawed and squeezed dry
  • 4 tablespoons shredded part-skim mozzarella
  • roasted red pepper strips
Directions:
  • Melt coconut oil in a large skillet over medium heat.
  • Season both sides of each chicken cutlet with TSSS and TSGG.  Sauté them on both sides until just cooked through.
  • Divide the spinach on top of the cutlets, followed by the cheese and red pepper strips.  Cover the skillet and turn off the heat.  Let sit for a few minutes until the cheese is melted and spinach and red peppers are warmed.