Monday, November 5, 2012

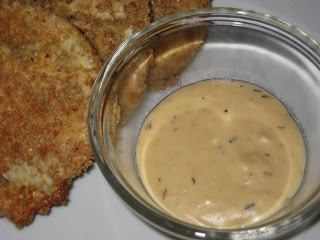
Goat Cheese Sauce

I love goat cheese.  LOVE goat cheese.  I saw on Pinterest a recipe for eggplant parmesan slices with goat cheese sandwiched in between.  It looked delish.  I was going to try it tonight, but hubby is working late and I needed something that didn't need last-minute assembling.  So I thought a sauce.  To drizzle over it?  Or to dip it into?  Yep, a sauce.  A creamy, tangy goat cheese sauce.  YUM!

Goat Cheese Sauce


Ingredients:
  • 1 tablespoon Smart Balance
  • 1 tablespoon whole wheat flour
  • 1 cup evaporated skim milk
  • 1 (5 oz.) log of goat cheese, cubed or crumbled
  • pinch of thyme
  • dash of Tastefully Simple Garlic Garlic
  • dash of Tastefully Simple Seasoned Salt
Directions:
  • In a small pot, whisk together the Smart Balance and flour over medium heat for about 30 seconds to make a roux.  Add the evaporated skim milk and continue whisking to dissolve any lumps from the roux.  Once the milk barely begins to simmer, whisk in the crumbled goat cheese, thyme, TSGG and TSSS.  Keep whisking until the cheese is melted and the sauce is smooth and creamy.  If you like it thinner you can add a little more milk.  Serve spooned over food (eggplant parmesan discs, baked chicken breasts, steamed broccoli, etc.) or as a dipping sauce.

Monday, October 29, 2012

Pumpkin Flax Oatmeal Muffins

I was playing in the kitchen today and used my Blueberry Oatmeal Muffin recipe as the springboard for some pumpkin muffins.  I used canned pumpkin puree, but you can certainly use freshly-made puree.  If you buy the canned stuff, make sure that it is just plain pumpkin puree, not pumpkin pie filling.  The hubs will be thrilled to have these for breakfast this week instead of our usual overnight oatmeal.

Pumpkin Flax Oatmeal Muffins
Makes 2 dozen muffins


Ingredients:
  • 1.5 cups whole-wheat flour
  • 1.5 cups rolled oats
  • 1 teaspoon salt
  • 1 teaspoon baking soda
  • 1 teaspoon baking powder
  • 2 teaspoons ground cinnamon
  • 2 teaspoons ground nutmeg
  • 1 teaspoon ground ginger
  • 1/2 teaspoon ground cloves
  • 4 eggs
  • 2 cups brown sugar, packed
  • 1.5 cups ground flaxseed
  • 1 teaspoon vanilla extract
  • 1/2 cup water
  • 1 can (15 oz.) pumpkin puree
  • 1 cup coarsely chopped walnuts
Directions:
  • Preheat oven to 400 degrees F.  Line two 12-count muffin pans with cupcake liners.
  • In a bowl, stir together the first 9 ingredients (dry).  Set aside.
  • In a separate mixing bowl, beat eggs, sugar, ground flaxseed, vanilla, water and pumpkin puree.
  • Gradually combine the dry ingredients with the egg mixture just until everything is moistened.  Do not over-stir. 
  • Gently fold in the walnuts.
  • Divide batter into the prepared muffin pans.
  • Bake for 20 minutes until golden.

Sunday, October 28, 2012

Yogurt in a Klean Kanteen

I usually use a crockpot or my rice cooker as the incubator for making homemade yogurt.  But as I was having a little fun experimenting with different ways to keep the milk mixture warm as it cultured, I discovered that an insulated Klean Kanteen works rather well.  (Make sure it's an INSULATED Kanteen, not the regular Kanteen.)  It doesn't quite keep the heat long enough for a thick Greek-style yogurt, but it is perfect for a softer yogurt (think mainstream yogurts like Yoplait or Danon), or even a drinkable yogurt.  It's best to use a 2% milk (or even whole milk if you're so inclined) in this case, as opposed to skim, since skim milk doesn't thicken up as well as its fattier counterparts.

I used a 16 oz. insulated Klean Kanteen.  This would also work well in the 12 oz. insulated.  I would not use the larger 20 oz. insulated unless you're making a drinkable yogurt, only because it was a little difficult reaching the bottom of the 16 oz.; you would need an extra-long spoon to scoop from the 20 oz.  I can't wait for the insulated food canisters to come out, they would be perfect for making yogurt.

This recipe makes enough to fill one 16 oz. insulated Kanteen.

Yogurt in a Klean Kanteen


Ingredients:
  • a scant 2 cups 2% (or whole) milk
  • 2 tablespoons organic dry milk powder (optional.  Omit if you are using whole milk or making a yogurt drink instead of a spooned yogurt.)
  • 2 tablespoons organic starter (store-bought organic nonfat plain yogurt, or reserved yogurt from your last batch)
Directions:
  • Fill your insulated Kanteen with hot tap water, as hot as you can get it.  Tightly screw on the leakproof loop cap and set aside.
  • In a small pot, combine the milk and milk powder.  Over medium heat, bring the milk to 185 degrees F, whisking frequently.  It will produce small bubbles.  In the meantime, fill your sink with about 2 inches of cold tap water.
  • Once the milk reaches 185 degrees F, remove from heat and place the pot into the cold water bath.  Stir frequently until the milk temperature goes down to 120 degrees F.
  • Once the milk goes down to 120 degrees F, whisk in the starter.  Make sure you whisk it well to dissolve it all.
  • Pour the hot water out of your insulated Kanteen (shake it upside down to get as much out as you can).  At this point it should be warm inside.  Pour the milk mixture into your insulated Kanteen and tightly screw on the leakproof cap.
  • Put the filled Kanteen somewhere draft-free and out of the way so it won't be jostled.  Let the yogurt incubate for about 5 hours.  I've found that after 5 hours the yogurt is only still barely warm, so at that point you should place it in the fridge until you're ready to eat it.  It will firm up a little more once cold.  If you want a softer yogurt for drinking, only incubate it for 3ish hours.
  • Serve plain, or mix with some honey, preserves or fresh fruit.
Play around with the incubation times based on what kind of yogurt you like.

The above pictures were taken right after the yogurt had finished incubating for 5 hours.  Here is how it looked after being refrigerated for 24 hours.  So thick it needs to be scooped out because it won't pour.  YUMMY!

Wednesday, October 17, 2012

Plain Yogurt

I eat yogurt every day.  Not the regular Yoplait stuff, but the thick expensive Greek-style stuff.  I use it in refrigerated overnight oatmeal, which I eat for breakfast almost every morning, and many times I'll have a Chobani for snack during the day as well.  Then one day I saw a link for homemade yogurt on Pinterest, and yes, it piqued my interest.  So I followed the link, and then continued to do more research via Google.  There are a gazillion different ways to make homemade yogurt, with the most popular involving a yogurt machine.  Which I do not have.  And don't want to buy.  Because I lack storage space.  And counter space.  So I compiled a list of recipes and methodologies and began experimenting.

This is what works for me based on these two sites that I found most helpful:

King Arthur Flour - yes, their method involves a yogurt machine, but what I took away from here was that they used nonfat milk and added nonfat dry milk powder to thicken.  My first try with nonfat milk without the powder was too runny.  The addition of powdered milk thickened it perfectly.  When I use 2% milk I find I don't need to add the powder.

The Frugal Girl - she uses whole milk (blech!), but I liked her hot water bath idea.  Not in a big cooler, though.  Her 3-hour incubation time is way too short for 2% and nonfat milk, it was still runny at that point.  I had to incubate 12+ hours to get a nice, thick consistency.

My equipment was all stuff I had on hand: a tub of plain, nonfat organic yogurt, milk (I tried both 2% and nonfat), nonfat dried milk powder, a large sauce pan, some mason jars, and an incubating device (I tried my electric rice cooker, my crockpot, and my Klean Kanteen insulated bottle).  The rice cooker and crockpot worked the best, the Klean Kanteen did work well, but only retained the heat for about 5 hours, which is fine if you like a thinner yogurt (like Yoplait).  I just prefer it a little thicker, so I need longer heat retention for a longer incubation time.

The only thing I didn't have and had to buy was an instant-read thermometer, which I'd been meaning to get anyway.

Also, I had to fiddle around a little until I found the right ratios for my preferences.  So depending on how you like your yogurt, you may need to fiddle as well.  A half gallon is perfect for our family; it conveniently makes 4 pint-sized mason jars, plus an additional half-ish cup that I put into a half-pint jar and is the perfect amount to reserve for the next batch.

I love this homemade stuff because it's tangy and smoooooooooooth.  I don't normally eat just plain yogurt (I'm partial to a drizzle of honey), but I love this stuff straight out of the jar.  It's that good.  The kids and hubby like to add fresh fruit or a little bit of preserves to it.  It's thicker than regular yogurt, but not quite as thick as Greek-style yogurt.  If I want thicker yogurt I just strain it over cheesecloth for an hour or so.

The directions look long, but the process is really simple once you go through it: scald the milk, bring down the temperature to add the culture, place it into a warm incubator and let it set.  I just added a lot of detail.

Plain Yogurt


Ingredients:
  • 1/2 gallon organic nonfat or 2% milk
  • 1 cup organic nonfat dry milk powder (omit if using 2% milk)
  • 1/2 cup organic starter (store-bought organic nonfat plain yogurt, or reserved yogurt from your last batch)
Directions:
  • For the incubator, plug in your electric rice cooker or crockpot.  Pour about 2 inches of water into the cooking receptacle, put the lid on and set to "warm".  Set aside.
  • For the yogurt, pour milk and dry milk powder (omit powder if using 2% milk) into a large sauce pan.  Over medium heat, bring the milk to 185 degrees F, stirring frequently.  It will produce small bubbles.
  • In the meantime, fill your sink with about 2 inches of cold tap water.
  • Once the milk reaches 185 degrees F, remove it from the heat and place the sauce pan into the cold water bath.  Stir frequently until the milk temperature goes down to 120 degrees F.
  • In the meantime, unplug your incubator and check the temperature of the water in your incubator.  My rice cooker and crockpot "warm" at about 135 - 140 degrees F.  If your incubator water is above 120 degrees F, add a few ice cubes at a time to bring it down to 120.  Unplug, then put the lid on to keep it warm. 
  • Once the milk goes down to 120 degrees F, whisk in the starter.  Make sure you whisk it well to dissolve it all.
  • Divide the milk into your mason jars.  Cap them tightly.
  • Place the jars into your incubator's warm water bath and close the lid.  If using a crockpot, cover the whole thing with a thick bath towel.
  • Put the incubator somewhere draft-free and out of the way so it won't be jostled.  Let the yogurt incubate for 10 - 12 hours (overnight is good).
  • Once it's done incubating and reaches your desired thickness, refrigerate promptly.  It will thicken a smidge more in the fridge.
  • Serve plain or topped with your favorite fruit, preserves, or a drizzle of honey.

Monday, October 8, 2012

Sprouted Bean Soup

Last week I started sprouting beans.  I sprouted some garbanzos and some adzukis.  The garbanzos are delicious eaten raw; I ate the entire first batch in a few days.  The raw adzukis did not taste good to me, they were a little too spicy/bitter.  So I thought I'd throw them in a soup for today's Meatless Monday menu.  It was really good.  I love me some random soups.  :-)

Sprouted Bean Soup


Ingredients:
  • 1 carton (4 cups) vegetable broth
  • 4 cups water
  • 2 cups sprouted adzuki beans
  • 1 cup sprouted garbanzo beans
  • 1 (15  oz.) can of diced tomatoes
  • 1/2 head cauliflower, chopped
  • 1/4 lb. dry whole wheat shell pasta
  • Tastefully Simple Seasoned Salt, to taste
 Directions:
  • In a large dutch oven, bring the broth and water to a boil.  Add in the beans and tomatoes.  Bring to a boil, then reduce to simmer and cook, covered, until the beans soften (but are not mush), 45 mins - 1 hour.  I like my beans with a little texture, but if you like them softer, go ahead and simmer them for longer.
  • Add in the cauliflower and pasta and bring to a boil.  Cook for another 15 minutes.  Season with TSSS to taste.

Sunday, October 7, 2012

Butternut Squash Stuffed with Chicken and Cheese

Shredded chicken is a staple in my freezer for quick meals.  It's a staple, but not very glamorous.  So I thought I'd try something new today: mix it up w/ cheese and marinara sauce, then bake until ooey gooey.  YUM!

I used some leftover butternut squash bottoms (the bulbous part with the seeds inside).  I'd already used the top parts for something else last week.  If you have whole squashes on hand, just cut off the straight top section, wrap it in foil and refrigerate it for another meal.

Butternut Squash Stuffed with Chicken and Cheese


Ingredients:
  • 1 small butternut squash bottom, halved with seeds scooped out
  • salt & pepper
  • 1-ish cup cooked shredded chicken breast
  • 1-ish cup prepared marinara sauce (I used Trader Joe's from a jar)
  • a few tablespoons shredded mozzarella
  • a few tablespoons of parmesan (optional)
Directions:
  • Preheat oven to 375 degrees F.
  • Place butternut squash halves, skin down, on a baking sheet sprayed with cooking oil.  Sprinkle lightly with s&p.  Bake for about 45 minutes until fork tender.  (You can pre-bake the empty squashes a few days in advance, then wrap them in foil and refrigerate until you're ready to fill them.  Or if you fail to plan in advance, like me sometimes, you can microwave the squash halves for about 4 - 5 minutes until tender.)
  • Meanwhile, mix the chicken and marinara sauce together in a bowl.  Season with more s&p as needed.
  • Once the squash is fork tender, remove from the oven and fill with the chicken mixture and top with the mozzarella (and optional parmesan).  Return the squash to the oven for another 20 - 30 minutes until cheese is melted and everything is bubbly.

Tuesday, September 25, 2012

Massaged Kale Salad with Butternut Squash and Dried Cranberries

Most of my friends know how much I love massaged kale salads.  We have it at least once a week, often twice.  So last week my friend Melanie forwarded me this massaged kale salad recipe that includes roasted butternut squash and dried cranberries.  Looked delish!  I read through it once, but then promptly forgot everything except butternut squash and dried cranberries.  So when I went to make it for dinner tonight, I had the butternut squash and dried cranberries, but of course I didn't have any poppy seeds.  Or shallots.  Or lemons, even!  So I had to improvise and combined the two recipes together, and used a lime.  It was really good!  Thanks for the recipe, Melanie!

Massaged Kale Salad with Butternut Squash and Dried Cranberries
Inspired by this recipe.


Ingredients:

  • 1 small-ish butternut squash
  • 2 tablespoons olive oil, divided
  • Tastefully Simple Seasoned Salt
  • 1 large bunch of kale
  • juice of 1 large lime
  • 1/2 teaspoon Kosher salt
  • 2 tablespoons dried cranberries 
  • several turns of the black pepper grinder
Directions:
  • Pre-heat oven to 400 degrees F.  Peel the butternut and cut into 1/2-inch cubes.  Toss with 1 tablespoon olive oil and some TSSS to taste.  Spread the squash out onto a baking sheet and roast until tender, about 30 minutes.
  • In the meantime, wash and spin-dry the kale, remove the thick middle stem, and chop or tear the leaves into bite-size pieces.
  • Place kale, remaining 1 tablespoon of olive oil, lemon juice and salt into a large bowl.  Massage the kale with your hands for a few minutes until it becomes soft.
  • Add the cranberries, roasted butternut squash, and black pepper and toss.

Monday, September 17, 2012

Random Veggie Soup

Cleaning out the fridge.  The soup was a hit, even with the 19-month-old.

Random Veggie Soup


Ingredients:
  • 3 carrots, chopped
  • 3 celery stalks, chopped
  • 1/2 onion, chopped
  • 1/2 head cabbage, chopped
  • 1/2 head cauliflower, chopped
  • 2 (15 oz.) cans of diced tomatoes
  • Tastefully Simple Seasoned Salt, to taste
  • 6 cups water
  • 1/2 lb. brown rice noodles
  • freshly cracked black pepper and grated parmesan for garnish
Directions:
  • Place the first 8 ingredients (up to the water) into a large soup pot.  Bring to a boil, then reduce to simmer and cook until veggies are tender, about 45 minutes.
  • Add the brown rice noodles.  Bring to a boil, then reduce to simmer again and cook until the noodles are tender, about 10 - 12 minutes (check the instructions on your rice noodle package).  Add more water if necessary.
  • Ladle into bowls and top with pepper and grated parmesan right before serving.

Thursday, September 6, 2012

Ranch Shrimp Tacos

I made some homemade 100% whole wheat tortillas for the first time today.  They were soooo good.  And soooo easy.  Just a little time consuming.  But soooo worth it.  Both kids each ate TWO.  EACH.  Straight off the pan.  This is the recipe I used for the tortillas.  If you have neither the time nor the urge to make your own tortillas, by all means buy them.  Whatever floats your boat.  :-)

Jumbo shrimp (wild caught!) are on sale at Sprouts this week.  So I decided to make shrimp tacos.  But I'd spent so much time making the tortillas that I had to do something quick with the shrimp.  So I grabbed the bottle of ranch dressing in the fridge.  Weird?  Maybe.  But they were GOOD!

Ranch Shrimp Tacos


Ingredients:
  • 2 tablespoons coconut oil
  • 2 (4 oz.) packages of beech mushrooms
  • 1 pound shrimp, peeled & deveined
  • Tastefully Simple Seasoned Salt
  • Tastefully Simple Garlic Garlic
  • a pinch of cumin
  • a couple tablespoons of ranch dressing (or more)
  • 6 small whole wheat tortillas, warmed
Directions:
  • Sauté the mushrooms in coconut oil over medium-high heat until soft.  Add the shrimp, TSSS and TSGG to taste, and a pinch of cumin.  Continue to sauté until the shrimp is cooked through, about 5 minutes.
  • Remove pan from heat and let sit to cool for a few minutes.  Then add the ranch dressing and spoon into the warm tortillas.

Sunday, September 2, 2012

Buffalo Chicken Salad

I was craving buffalo wings this weekend.  There's something so delicious about crispy, juicy, spicy wings dipped into cool ranch dressing.  DROOL!

I thought I'd throw something together that was a little healthier.  I bought a bottle of Frank's Original Hot Sauce, heated it up with a little Smart Balance, tossed in some cooked shredded chicken breast, and threw it over a green salad.  YUM!

Buffalo Chicken Salad


Ingredients:
  • 2-ish tablespoons Smart Balance
  • 1/2-ish cup Frank's Original Hot Sauce
  • 3-ish cups cooked shredded chicken breast
Directions:
  • Melt the Smart Balance in a small sauce pan over medium-low heat.  Once it's melted, add the hot sauce and bring to a simmer.
  • Add in the chicken, toss well, and heat through.

I spooned it over a green salad and drizzled with reduced-fat ranch dressing.  I'll be using the leftovers tomorrow for buffalo chicken sandwiches with whole wheat rolls.  I'm a happy camper.

Monday, August 27, 2012

Mushrooms with Sake Gravy

I was going to make the usual mushroom cream sauce today, but then saw hubby's opened bottle of sake in the fridge.  Pre-kids I used to cook a fair amount with wine.  And the kids had already asked for, and eaten, popcorn chicken from Sonic, so dinner was just for the two adults.  Hmmm...

The sake gravy was a tad bitter (probably had to do with the type of sake we had) so I added a teaspoon of honey.  And then at the last minute I tossed in some arugula for color.  I served it over Himalayan red rice, but brown rice would be just fine.

Mushrooms with Sake Gravy


Ingredients:
  • 2 tablespoons Smart Balance
  • 1 pound mushrooms, cleaned and sliced (I used trumpets and criminis)
  • Tastefully Simple Seasoned Salt
  • 1 pinch dried thyme
  • 2 tablespoons whole wheat flour
  • 1 cup sake
  • 1 cup water
  • 1 teaspoon honey (optional)
  • 2 large handfuls of arugula, washed and dried
  • freshly cracked black pepper
Directions:
  • In a large skillet, melt the Smart Balance and sauté the mushrooms until soft, about 7 minutes.  Sprinkle with TSSS, thyme and whole wheat flour. Stir for about a minute for the flour to lose its raw taste.  Add the sake and water and more TSSS to taste.  Bring to a boil, then reduce to simmer for a minute until the gravy thickens.  Depending on how much liquid the mushrooms let off, you may need to add a little more water.
  • Taste the gravy, and if it's too bitter, add a little bit of honey.  Toss in the arugula and stir until wilted.  Add some freshly cracked black pepper.
  • Serve hot over cooked rice.

Monday, August 20, 2012

Veggie Soup with Quinoa

This is just another random soup I threw together, but Veggie Soup with Quinoa sounds like a more appetizing title.  ;-)  It's still hot outside (I had the a/c running all day, set at 77 degrees), but I wanted soup.  Again.  I'm crazy, I know.  A big hearty bowl of veggie soup sounded so appetizing this afternoon, so that's what I made.

Veggie Soup with Quinoa


Ingredients:
  • 1 tablespoon coconut oil
  • 1/2 onion, sliced
  • 1 cup dry quinoa, rinsed and drained
  • 4 cups water
  • 8 oz. sliced crimini mushrooms
  • 1 (15 oz.) can of petite diced tomatoes
  • 1 (14 oz.) can of artichoke hearts, drained and quartered
  • 1 (15 oz.) can of red kidney beans, rinsed and drained
  • 1 teaspoon dried basil
  • 1/2 teaspoon dried thyme
  • a few dashes of Worcestershire sauce
  • salt & pepper to taste
  • 1/2 cup grated parmesan, plus some for garnish
  • 1 small bunch of kale, washed, rinsed and chopped
Directions:
  • In a large pot, melt the coconut oil over medium heat and sweat the onions.  Add the quinoa and stir for a minute.  Add the rest of the ingredients, except for the parmesan and kale.  Bring to a boil, then reduce to simmer and cook, uncovered, for about 20 minutes until the quinoa is tender.
  • Add the parmesan and chopped kale.  Stir and cook for about 5 minutes until the kale softens.  Adjust salt & pepper as necessary.
  • Ladle into bowls and top with a sprinkle of grated parm.
I would have loved some crusty bread to go with this, but I didn't have any.  So I used some warm naan.  Yum.

Monday, July 30, 2012

Baked Eggs and Rice

Another Meatless Monday here.  I was going to make some stratas but discovered last minute that I didn't have any bread.  But I had leftover cooked rice.  Ok, let's give it a try.

It came out very good.  Kinda reminds me of a steamed Vietnamese dish made of eggs, mung bean threads and black fungus.  You can obviously use any combo of veggies and even ground meat in here, but this was tonight's version.

Baked Eggs and Rice


Ingredients:
  • Smart Balance
  • 1/4 onion, chopped
  • 1/2 a container of mushrooms (approx. 2.5 oz.), chopped
  • 1 large handful of kale, washed, dried and chopped
  • about 1/2 cup cooked rice
  • Tastefully Simple Seasoned Salt
  • 6 eggs
Directions:
  • Pre-heat oven to 350 degrees F.  Grease two large (I used 12-oz) ramekins with Smart Balance.  Set aside.
  • In a sauté pan, sweat the onion with 1 tablespoon Smart Balance over medium heat.  Add the mushrooms, kale, and TSSS, then cook, stirring often, until everything is soft.  Add rice and combine.  Remove from heat and let cool for 5 minutes.
  • Meanwhile, lightly beat the eggs with a fork in a separate mixing bowl.  Add the rice and veggie mixture to the eggs and combine.  Divide between the two greased ramekins.
  • Bake for 20 - 25 minutes until eggs are set.

Thursday, July 26, 2012

Squash and Chicken Stew

So it's a gazillion degrees outside and I'm feeling stewey.  (Mom...Mom...Mom...Mummy...Mum...Mummy...)  At least it's a one pot deal.

Butternut squash was on sale at the grocery store.  I love the creamy sweetness of butternut squash.  I also got a nice bunch of cherry tomatoes and two beautiful yellow squashes from my tiny garden. Into the pot!

Squash and Chicken Stew
Inspired by this recipe.


Ingredients:
  • 2 tablespoons coconut oil
  • 1/2 onion, chopped
  • 2 cloves garlic, minced
  • 1 medium butternut squash, peeled, seeded and cut into 1/2 inch cubes (about 3 cups)
  • 2 cups cherry tomatoes, halved
  • 2 cups chicken broth
  • 2 cups water
  • 2 medium yellow squashes, sliced
  • 1 (5 oz.) container of sliced button mushrooms
  • 1 (15 oz.) can of black beans, drained and rinsed
  • 3 cups shredded cooked chicken
  • large pinch of dried oregano
  • large pinch of dried basil
  • large pinch of dried thyme
  • Tastefully Simple Seasoned Salt to taste
  • freshly ground black pepper to taste
  • grated parmesan for garnish (optional)
Directions:
  • Heat oil in a dutch oven over medium heat.  Sauté the onion until soft and translucent.  Add the garlic and stir for a minute until fragrant.
  • Add in the butternut squash, tomatoes, chicken broth and water.  Bring to a boil, then reduce to simmer and cook, covered, until the butternut squash is almost tender, about 15 minutes.
  • Add in the rest of the ingredients (except the parmesan).  Bring back to a boil, reduce to simmer, and continue to cook, covered, until the veggies are all tender, about 15 minutes.
  • Ladle into bowls and top with grated parmesan.

Saturday, July 21, 2012

Off Topic - Decorated Cookies - Ferrari Farms Ladybugs

July - cookies for Todd's work department potluck at Ferrari Farms; monogram and ladybug cookies
6 dozen 100% whole wheat vanilla sugar cookies with rainbow jimmies thrown in just for fun.

Monday, July 16, 2012

Tomato and Roasted Red Pepper Soup

Sprouts has beautiful vine-ripened tomatoes on sale.  And I have a ton of roasted red peppers from their sale a couple weeks ago.  Pair that with some fresh homemade bread and you've got a yummy Meatless Monday meal.

Tomato and Roasted Red Pepper Soup


Ingredients:
  • 4 large tomatoes
  • 2 red peppers, roasted, seeded and peeled
  • 1/2 onion, chopped
  • 1 cup water
  • 1/2 teaspoon dried basil
  • salt & pepper
  • 1 can evaporated nonfat milk
Directions:
  • In a large pot, bring some water to a boil.  Put the whole tomatoes in and boil for a few minutes.  Transfer the tomatoes to an ice bath.  This will help you to peel them.  Peel and chop the tomatoes, remove seeds.
  • Place the chopped tomatoes into a clean pot.  Add the roasted red peppers, onion, water, dried basil and some salt to taste.  Bring to a boil, then reduce to simmer.  Cook for about 20 minutes until the tomatoes are tender/soft.  (Cook longer if you want a really smooth soup.  I like mine with texture so the tomatoes are soft but do not disintegrate.)  Puree with a stick blender.
  • Add the evaporated nonfat milk and continue to simmer until the soup is heated through again.  Add salt and pepper to taste.

Tuesday, July 10, 2012

Stuffed Zucchini

Another use-what's-in-the-fridge night including another delicious giant zuke from Ferrari Farms (thanks, Cheri and Dorian!).  The marinara on top was an afterthought when the top of the filling looked dry as it was baking; next time I will probably either mix it in, or omit it but cover the tops with foil while baking.  Soooo good!

Make sure you drain the meat mixture and squeeze the spinach really dry.  Mushrooms and zucchinis put out a lot of liquid when cooked, and if your filling is too moist the whole thing will be soupy.

Stuffed Zucchini


Ingredients:
  • olive oil
  • 2 large zucchinis
  • Tastefully Simple Seasoned Salt
  • 1/2 onion, chopped
  • 2 cloves garlic, minced
  • 1 pound lean ground sirloin
  • 1 (8 oz. bag) trumpet mushrooms
  • 1 large handful frozen spinach, thawed and squeezed dry
  • 1/2-ish cup crumbled feta cheese
  • 1 egg
  • a few tablespoons prepared marinara sauce (optional)
Directions:
  • Pre-heat oven to 350 degrees F.  Spray a baking sheet with olive oil and set aside.
  • Cut the zukes in half and remove the pulp, keeping a 1/2-inch border all around.  Chop and reserve the pulp.  Place the zuke halves cut side up on the sprayed baking sheet and sprinkle lightly with TSSS.  Set aside.
  • In a skillet over medium heat, saute the onion and garlic in a tablespoon of olive oil until soft. Add the ground sirloin, some TSSS to taste, and brown.  Drain.
  • Add the reserved zucchini pulp, mushrooms and spinach and continue to saute until the mushrooms are soft.  Drain.  Remove from heat and let cool for 5 minutes.
  • Add the feta and egg and combine.
  • Divide the mixture into fourths and fill each zucchini half.  Cover with foil (so they don't dry out) and bake for 25 - 30 minutes.  Remove the foil (and top each zuke with a little marinara sauce - optional) and continue baking for another 5 - 10 minutes until the zukes are tender (but not mushy).

Monday, July 9, 2012

Quinoa Lentil Chili

Today is Meatless Monday.  I've been doing Meatless Monday for several months now, where I cook meatless meals for dinner.  Part of it is health-driven (eat more veggies and legumes), part of it is eco-driven (lessen our footprint on the planet), part of it is spiritually-driven (don't kill, even animals), and part of it is to force myself to experiment with ingredients/methods/recipes I otherwise would not use.  Today's experiment was with quinoa, you know, that supergrain-that's-also-a-complete-protein that's been all the rage these past few years.

I'll admit it - I've never had quinoa before.  Wait, I take that back.  In the early 2000s I went on a training seminar for work, and my roommate introduced me to quinoa.  We were in one of those extended stay suites with kitchen, so she prepared it for dinner one night.  I don't remember how she prepared it, but it was awful, so needless to say it's taken me about 10 years to actually want to give it another try.

I have quinoa.  And I have some beautiful red lentils.  How about a vegetarian chili?  I browsed the internet for recipes.  There's a bunch out there, but I settled on a combination of this one and this one as my main guide.  And of course I used what was in my fridge and pantry.  I served it with a slice of toasted rosemary garlic sourdough; it was really good.  Hubby had it with Triscuits.

Next time I think I'll add a bell pepper and a can of kidney or garbanzo beans.

Quinoa Lentil Chili
Inspired by this recipe and this recipe.


Ingredients:
  • 2 tablespoons olive oil
  • 1 onion, chopped
  • 4 cloves garlic, minced
  • 1/2 cup uncooked quinoa, rinsed and drained
  • 1/2 cup dried red lentils, rinsed and drained
  • 2 cups water
  • 1 (15 oz.) can of diced tomatoes
  • 2 carrots, chopped
  • 2 stalks celery, chopped
  • 1 large zucchini, chopped
  • 2 tablespoons chili powder
  • 1 tablespoon cumin
  • 1 teaspoon paprika
  • salt & pepper to taste
Directions:
  • In a large dutch oven, sweat the onion in the olive oil over medium heat. Add the garlic and stir for a minute.
  • Add the quinoa and lentils, water and diced tomatoes.  Bring to a boil, then reduce to simmer and cook, covered, for about 20 minutes.
  • Add the rest of the ingredients, bring to a boil and reduce to simmer again.  Cook, covered and stirring occasionally, for another 20 - 30 minutes until lentils and vegetables are tender.

Tuesday, July 3, 2012

Off Topic - Decorated Cookies - July 4th Fireworks and Butterflies

July - More Independence Day cookies; USA and fireworks cookies; patriotic butterfly cookies
The square ones were for hubby's work (1 dozen triple vanilla sugar cookies), and the butterflies were for Claire's dance class (1 dozen vanilla sugar cookies).

Sunday, July 1, 2012

Off Topic - Decorated Cookies - Tulips, Daisies, Butterfly, Retirement, Sea Turtles, 4th of July Flag with Star Spangled Banner

May - a Random Act of Cookie for the Werner family; daisy, tulip and butterfly cookies
1/2 dozen vanilla and 1/2 dozen chocolate sugar cookies.


May - Chu Long's Retirement / Welcome Home party; freehand happy face and wine glass cookies
3 dozen chocolate sugar cookies
 

June - Claire's Birthday; turtle cake and turtle cookies
She's been obsessed with baby sea turtles lately, so that was the theme of her party.  The cookies were for her classroom. Devil's food cake birthday cake, 3 dozen triple vanilla sugar cookies.


July - Independence Day; flag cookies
I didn't plan out the lettering as well as I could/should have so I ended up having to put in filler squiggles. Oh well. At least there are fifty stars in there. :-) 2 dozen vanilla sugar cookies.

Friday, June 29, 2012

Zucchini Lasagna

What do you do with a gigantic zucchini that you receive from friends (thanks, Ferraris!)?  You make a lasagna, of course.


I've seen this a number of times on Pinterest, and it sounded good, so I thought I'd give it a try.  It's more of an idea than a recipe.  You just take thin slices of zucchini (or eggplant) and layer them, in place of noodles, with typical lasagna ingredients like sauce, cheese, ground beef/sausage, etc.  It was absolutely delicious, and I didn't miss the noodles at all.

One note: zucchinis release a lot of liquid when cooked, so try to keep your sauce on the thicker/drier side, otherwise it will come out a little soupy.  Still tasty, though, but you might need a spoon instead of a fork.

Zucchini Lasagna


Ingredients:
  • zucchinis, cut thinly into 1/8" slices
  • typical lasagna ingredients, minus the noodles
Directions:
  • Layer ingredients into a baking dish like you would a typical lasagna, using the sliced zucchini in place of noodles.  Bake as usual. (I did mine at 350 degrees F for 30 minutes, and the zucchini was perfectly "al dente".)

Wednesday, June 27, 2012

Steak Chili

A slightly fancier version of my Chilly Night Chili.  Perfect for rewarding your hubby on those days when he vacuums the floors without you asking.  :-)

Steak Chili


Ingredients:
  • 1.5 lbs. roast or steak, trimmed of all visible fat and cut into 1/2 inch cubes
  • 1 medium onion, diced
  • 1 green bell pepper, seeded and diced
  • 2 stalks celery, diced
  • 2 (15 oz.) cans of beans, drained (pinto, kidney, black, etc.)
  • 2 cans (14.5 oz.) petite diced tomatoes
  • 2 tablespoons chili powder
  • 1 teaspoon cumin
  • 1 teaspoon paprika
  • a few generous dashes of Worcestershire sauce
  • salt & pepper to taste

Directions:
  • Place all the ingredients into a crockpot and cook on low for 8 hours, stirring occasionally.  Add more s&p at the end if necessary.

Tuesday, June 26, 2012

Baked Shrimp and Rice

I made this last week but forgot to take pictures.  It's based on this other recipe that bakes shrimp atop a bed of chickpeas.  I had some leftover rice and thought it might be good that way.  Thankfully it was yummy and hubby asked for it again, so here you go, second time in a week.  So quick and easy.

Note: make sure you cover the surface of the rice with the shrimp as much as possible to preserve moisture and keep the rice tender.  If you have large areas of uncovered rice, the tops will dry out and get hard and crunchy from baking.

Baked Shrimp and Rice


Ingredients:
  • 1 lb. jumbo shrimp, peeled and deveined
  • 1 tablespoon olive oil
  • Tastefully Simple Seasoned Salt
  • Tastefully Simple Garlic Garlic
  • juice of 1/2 a lemon
  • 3 tablespoons Smart Balance, divided
  • 2-ish cups cooked brown rice
Directions:
  • Pre-heat oven to 400 degrees F.
  • In a bowl, combine together the shrimp, olive oil, TSSS and TSGG, and lemon juice.  Set aside.
  • Grease the bottom of a 9x9 (or equivalent) baking dish with half the Smart Balance.  Spread the rice loosely in the bottom of the dish and dot the top with the rest of the Smart Balance.  Sprinkle lightly with TSSS.
  • Arrange the shrimp on top of the rice.  Again, make sure the rice is well covered by the shrimp or it will dry out from baking.  
  • Bake for 15 minutes, until the shrimp is opaque and cooked through.
This goes great with a crisp green salad.

Monday, June 25, 2012

Vegetable Soup

I was drawn to the Farmer's Market and bought way too many veggies this weekend and don't have room to store them in the fridge. How fitting for Meatless Monday.

Vegetable Soup


Ingredients:
  • 2 tablespoons olive oil
  • 1 onion, chopped
  • 1 clove garlic, minced
  • 2 carrots, chopped
  • 3 ribs celery, chopped
  • 1 can diced tomatoes
  • 1/2 teaspoon thyme
  • salt & pepper
  • 2 cups vegetable stock
  • 4 cups water 
  • 1 cup dry whole wheat elbow pasta
  • 1 large zucchini, chopped
  • 1 large yellow squash, chopped
  • 1 can red kidney beans, drained
  • 1 can great northern beans, drained
Directions:
  • In a large dutch oven, heat the oil over medium heat and sauté the onion and garlic for a few minutes until they soften.
  •  Add the carrots, celery, diced tomatoes, thyme, salt & pepper (to taste), vegetable stock and water.  Bring to a boil, then reduce to a simmer and cook, covered for 15 minutes until carrots begin to soften.
  • Add the pasta, zucchini, yellow squash, and beans.  Bring to a boil again and reduce to simmer; continue cooking, covered, for another 15 minutes until the pasta is done.  Add more s&p as needed.

Saturday, June 23, 2012

Simple Tomato Beef Stew

This recipe is for Todd's friend, Brett.  A long time ago (5+ years?) we had Brett and some friends over for lunch.  I'd made a beef stew, and Brett asked for the recipe.  At that time I was winging it (I still wing it most of the time nowadays) and didn't keep a recipe book.  So I honestly don't remember exactly how I made it.  I decided to make a beef stew for dinner tonight and thought I might try to make something similar and document it for Brett.

Since I'm trying to keep this South Beach Diet friendly, I did not add any potatoes.  (I don't think I'd added potatoes back then either.)

Simple Tomato Beef Stew


Ingredients:
  • 2 tablespoons olive oil
  • 2 pounds rump round or chuck, trimmed of fat and cubed into 1" pieces
  • salt and pepper
  • 1/4-ish cup Worcestershire sauce
  • 2 cloves garlic, minced
  • 1 onion, chopped
  • 1 teaspoon dried rosemary
  • 1 teaspoon dried thyme
  • 3 carrots, cut into large pieces
  • 3 celery ribs, cut into large pieces
  • 2 (15 oz.) cans diced tomatoes
Directions:
  • Heat olive oil in a dutch oven over medium-high heat.  Generously season the cubed meat with salt and pepper, add to the heated oil and brown on all sides.
  • Add the rest of the ingredients in the order listed above and bring to a boil.  Reduce to medium-low heat to simmer.  Cook, covered, for about 2 hours, stirring occasionally, until the meat is tender.  Add more salt and pepper as needed.
  • Serve with crusty bread.
If you like a thicker stew, you can mix a tablespoon of whole wheat flour with a little bit of water until it forms a loose paste, then add it to the pot about 10 minutes before the end of cooking time.