Wednesday, March 24, 2010

Sweet Potato Gnocchi

I love traditional gnocchi, but it's a no-no on the South Beach Diet.  White potatoes are high on the glycemic index.  But sweet potatoes, they're a go-go.  Mashed sweet potatoes, roasted sweet potatoes, sweet potato fries, and now sweet potato gnocchi.  I came across this recipe on one of my favorite Blogs:  Kath Eats Real Food.  I was immediately intrigued, so today I tested it out.  O. M. G. !!!!!  These little morsels are the BOMB!  (Am I dating myself by using the phrase "the bomb"?)

There are a few steps so it does take a little time to make, but the end result is so worth it.  My toddler gobbled a handful of them as soon as they were just marginally cool enough for her to chew, and the hubby stated that this should be put into the weekly rotation.  As in every week.  And for breakfast.  Drizzled with a bit of maple syrup.

Sweet Potato Gnocchi
Lifted directly from this recipe with very few modifications.


Ingredients:
  • 2 large sweet potatoes, well baked or microwaved, cooled
  • 3/4 teaspoon kosher salt
  • 1/2 teaspoon cinnamon
  • 1 egg
  • 1.5 - 2 cups whole wheat flour (plus more for rolling)
  • olive oil
Directions:
  • Scoop the flesh out of the sweet potatoes and place into a large mixing bowl.  Discard skin.
  • Add salt, cinnamon and egg and stir until well incorporated.
  • Add flour, 1/2 cup at a time and mix thoroughly in between.  Continue adding flour and mixing until the dough has lost about 80% of its stickiness.  (Better to have it a little too sticky than to add too much flour because that can toughen the gnocchi.)
  • The original recipe says to turn the dough ball out onto a floured surface and knead it up into a tighter ball.  However, because I don't have a functional countertop (that's a story for another day), I was limited by the size of my cutting board.  So instead of working with the entire ball of dough all at once, I floured my cutting board and scooped out heaping spoonfuls of the dough and rolled them out.  It took a bit longer to do it this way because I had about 8-10 smaller rolls, but it worked for me.
  • Roll the dough out into thin tubes.  Make sure to sprinkle enough flour over the dough to keep it from sticking to your working surface and hands.
  • Cut tube into 1/2 inch pieces.
  • Bring a large pot of water to a boil.  Cook the dough pieces in about 4 batches so as not to overcrowd the pot.  Boil for about 5 minutes until the gnocchi float to the top.
  • Remove gnocchi with a strainer and place in an ice water bath for a couple of minutes to stop the cooking.  Drain them once they're cooled.
  • Heat a large non-stick pan over medium-high heat along with a tablespoon of olive oil. Sauté 1/4 of the batch of gnocchi for a few minutes until a nice brown crust forms.  (Sprinkle w/ a little bit of basil or rosemary or thyme or whatever you like.)
  • Serve immediately.  
If you want to freeze some for later, you'll need to do it after boiling and draining them but before sautéing them.  Place them in a single layer on a sheet pan and freeze until solid, about an hour.  Then take the frozen bites and put them into a plastic freezer bag.  When you're ready to eat them, place the bag in the fridge to thaw for a few hours (I usually do it the night before) and then sauté as usual.

These little gems are sweet, crusty, chewy, 100% South Beach Diet legal, and 100% delicious.  Enjoy!

Tuesday, March 23, 2010

Pasta with Spaghetti Squash Marinara


This is a great way to add extra veggies into your diet.  I normally make this with ground turkey instead of the garbanzo beans, but today I decided to go vegetarian.  You could also add diced zucchini or frozen chopped spinach to increase the veggie intake as well as the plate color appeal.  :-)

Pasta with Spaghetti Squash Marinara
I made this one up myself based on what I had in the pantry.


Ingredients:
  • 1 large spaghetti squash
  • whole wheat bowtie pasta
  • 1 jar no sugar added marinara sauce (I use Trader Joe's)
  • 1 can (15 oz) garbanzo beans, drained
  • salt & pepper (optional)
  • fresh mozzarella balls, diced
  • freshly grated parmesan
Directions:
  • Prepare whole wheat bowtie pasta according to package instructions, to al dente.
  • Using a sharp chef's knife, pierce the skin of the spaghetti squash in numerous locations.  Place in a microwave safe bowl and microwave on high for 8 - 10 minutes, turning it over halfway through.  Let sit until cool enough to handle.  Cut in half, lengthwise, and remove seeds along with the dark fibrous strands and discard.  Using a fork, scoop out the spaghetti-like strands and put them into a large sauce pan. 
  • Add marinara sauce, garbanzo beans and season with salt & pepper as needed.  Toss to mix everything together.
  • Bring to a boil, then lower the heat and simmer for 10 minutes, tossing occasionally.
  • Remove from heat and fold in the mozzarella.
  • Ladle over pasta.  Top with freshly grated parmesan.

Monday, March 22, 2010

Portabellas with Marinara

Portabellas with Marinara
Adapted from this recipe.


Ingredients:
  • PAM
  • Large portabella mushrooms, cleaned and de-stemmed
  • Tastefully Simple Seasoned Salt
  • any no sugar added jarred marinara sauce (I use Trader Joe's)
  • fresh mozzarella balls (one 1 oz ball per mushroom), sliced
Directions:
  • Preheat oven to 375 degrees F.
  • Spray a baking sheet (or a toaster oven pan if you're doing just one!) with PAM.
  • Place the mushrooms gill side up (like a shallow cup) on the sprayed pan.  Sprinkle with a little seasoned salt.  Fill with a couple spoonfuls of marinara.
  • Bake in oven for 15 minutes.
  • Add the mozzarella slices on top and return to oven .  Put on broil for a couple of minutes until the cheese melts.
  • Serve immediately.

Thursday, March 18, 2010

Impromptu Green Bean and Whatever Salad

My evening class got canceled today, YAY! Well, YAY for me, sorry for my teacher who is at home sick. :-( It's an absolutely beautiful day out, the sun is shining and it's about 72 degrees. Perfect park weather for a quick afternoon Moms' Group outing with the little tot.

I didn't feel like eating my boxed leftover lunch today, so I rummaged through the fridge and pantry to see what I had on hand. Some leftover green beans, a ripe avocado, and a box of baby heirloom tomatoes. I was debating between the pouch of tuna fish and the can of sardines. Tuna fish won out today, but I think next time I'll do the sardines. Gotta get in those weekly Omega-3s. :-)

Impromptu Green Bean and Whatever Salad
Based on whatever was in my fridge and pantry.


Ingredients:
  • a handful of steamed green beans, cut into bite-size pieces
  • a handful of baby heirloom tomatoes, halved or quartered
  • half an avocado, diced
  • some crumbled goat cheese for the tang
  • a pouch of tuna fish
  • Newman's Own Light Italian dressing
Directions:
  • Toss everything in a bowl and eat.
YUM!

    Wednesday, March 17, 2010

    Kale Chips

    You're probably thinking "Kale?  Eewww!"... but before you diss it, you've got to try it.  Seriously.  It's good!  Even my 21-month-old loves it, and here's the proof:


    Kale chips are nothing like what you know kale to traditionally taste like (in stews or as a bitter mushy side dish), or what you would imagine kale to taste like if you've never had it before.  Granted, they don't taste like potato chips because, well, they're not made from potatoes.  They're made from kale, silly.  But they're light and crispy, and in this case, taste like parmesan and seasoned salt.  Not a bad combo.  And it's a quick and easy way to get in that extra serving of veggies, the especially-good-for-you leafy green type of veggie.

    We devour an entire batch in one sitting, every time without fail, and that 21-month-old I mentioned above, well, she eats her fair share.

    Kale Chips
    Adapted from this recipe.


    Ingredients:
    • A giant bunch or two of green kale
    • olive oil spray
    • salt (your favorite seasoned brand, or, I use pink Himalayan)
    • grated parmesan
    Directions:
    • Thoroughly wash the kale (they grow in the dirt so tend to be, well, dirty.  HA!).  Remove the thick stems and cut the kale leaves into bite-size pieces.  Dry them in a lettuce spinner or by spreading them onto a few paper towels on your kitchen counter.
    • Preheat oven to 325 degrees F.
    • Spray a baking sheet or two lightly with olive oil.
    • Spread the kale out on the baking sheet(s) in a single layer.  Spray the tops lightly with olive oil.
    • Sprinkle lightly with salt.
    • Grate some parmesan over the whole thing, as much or as little as you like.
    • Bake for 20 - 30 minutes until the kale is crispy (it may be lightly browned but should still be mostly dark green; if you get to mostly brown, or all brown, it's burned and will be very bitter). My oven has hot spots, so I like to rotate the pans halfway through the cooking time.
    Be careful and watch it towards the end, there's only about a 2-minute window between crispy and burned.  After you do this the first time, you'll get a feel for how long it takes in your particular oven and won't have to hover so much towards the end.

    Tuesday, March 16, 2010

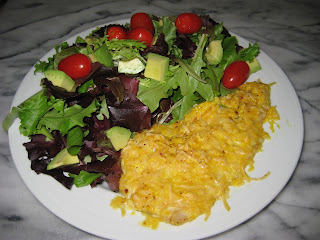
    Parmesan Crusted Red Snapper

    This recipe is so simple that it's an old old staple at our house.  It can be made with red snapper, tillapia, cod, sole or basically any tender white fish.  My original recipe doesn't call for any bread crumbs, but I was a little short on parmesan today, so I combined 1 part parmesan with 1 part bread crumbs to make enough coating.  Still very good, but I prefer the un-diluted parmesan crust because it gives a stronger flavor.

    Parmesan Crusted Red Snapper
    I don't remember where I got this idea from, I've been making it forever.


    Ingredients:
    • 4 medium red snapper fillets, skinned and de-boned
    • Dijon mustard
    • 1 cup-ish grated parmesan (or, in today's case, 1/2 cup parmesan and 1/2 cup whole wheat bread crumbs)
    • a few dashes of Tastefully Simple Seasoned Salt
    • PAM
    Directions
    • In a shallow bowl, combine parmesan (and optional bread crumbs) with some TS Seasoned Salt.  Set aside.
    • Using your hands, coat both sides of each fillet with mustard.
    • Dredge fillets in the parmesan mixture.  Make sure to thoroughly coat both sides of the fish.
    • Spray a frying pan with PAM and cook fillets a few minutes on each side until crust is nicely browned and fish is cooked through.  It shouldn't take very long (3-5 minutes on each side) since these types of fish are very light and tender.
    Eat more fish!  :-)

    3/5/12 ETA:  Today instead of cooking it in a pan, I baked it in the oven for 15 minutes on 350 degrees F.  The cheese melted into the mustard and turned into yummy gooeyness.

    Monday, March 15, 2010

    Baked Butternut Squash with Chicken and Parmesan

    I love butternut squash.  So does the hubby.  And the toddler.  But I always end up doing the same thing over and over: cubing, seasoning and roasting it in the oven.  While delicious, I wanted to try something new.  I came across this recipe (linked below) while searching on the Web, and was intrigued by the addition of the cream.  It sounded so luxurious.  And then I thought, "hey, why not make a meal of it?"... and so this recipe was born.  I swapped out the cream for evaporated skim milk, tinkered with the seasonings a little, and I added some chicken and red kidney beans.  Serve with a side of garlic green beans (optional) and you're good to go.

    Butternut Squash with Chicken and Parmesan
    Adapted from this recipe.


    Ingredients:
    • two large boneless, skinless chicken breasts, cubed
    • Tastefully Simple Seasoned Salt
    • PAM
    • 1 can (12 oz) evaporated skim milk
    • 1 large butternut squash, peeled, seeded and cubed
    • 1 can (15 oz) red kidney beans
    • a few dashes of ground nutmeg
    • a pinch of ground cinnamon
    • 1 1/2 cups grated parmesan, divided
    Directions:
    • Preheat oven to 375 degrees F.
    • Season the chicken well.  In a large skillet, brown the chicken with some PAM.
    • Once the chicken is browned (doesn't need to be fully cooked), add the evaporated skim milk, butternut squash, kidney beans and 1 cup of the grated parmesan (and more salt if you'd like).  Bring to a boil, stirring frequently.
    • Pour everything into a 9"x13" baking dish.  Bake for 40 - 50 minutes until squash is tender.
    • Sprinkle the top with the remaining 1/2 cup of parmesan and leave in the oven for a few minutes until melted.

      Thursday, March 11, 2010

      Parmesan Quinoa Cakes with Eggplant and Sausage Ragout

      This was only my second time making quinoa, and let me tell you, it was so much better than my first time!  The first time I ever made it was when I was in training in Chicago for my last job with IRI.  My roommate and a few of the other girls in the group were health nuts and the bunch of us went to Whole Foods and came back to the hotel with all sorts of stuff I'd never eaten before.  I had bought a cup of quinoa because I'd heard it was a supergrain, and since I was in good company, I figured that was the time to try it.  Hrmm, maybe not.  They'd bought already-cooked quinoa before, but they'd never cooked it from scratch so couldn't give me any tips.  I didn't thoroughly wash it so it was bitter and gritty.  I also didn't add enough water so it was very grainy.  Not a good experience.  So it's taken me a good 7 years to try it again.

      This time, I figured I'd try the quinoa cake-style with added egg and parmesan to ease myself back.  Anything is good with egg and parmesan, right?  The original recipe calls for it to be pan fried, but I baked mine to make it a little healthier.  It turned out pretty darned good.

      Just make sure you wash the quinoa very well before you cook it.  I rinsed it through 3 or 4 changes of water to get as much of the grittiness out as possible.  It was perfect.

      I sprinkled the mozzarella on top of the ragout, but I think next time it would be better to mix it into the ragout right at the end so it can melt slightly and get all ooey and gooey.  I reflected that in the directions below.

      Parmesan Quinoa Cakes with Eggplant and Sausage Ragout
      Adapted from this recipe.


      Ingredients:
      • For the Parmesan Quinoa Cakes
      • 1 cup quinoa
      • 1 1/2 cups water
      • pinch of salt
      • 2 eggs, lightly beaten
      • 3/4 cup grated parmesan
      • couple pinches of thyme
      • PAM
      • For the Eggplant and Sausage Ragout
      • 2 tablespoons extra virgin olive oil
      • 1 package sliced button mushrooms
      • 1 large purple eggplant, diced, salted and drained
      •  Tastefully Simple Seasoned Salt
      • Tastefully Simple Garlic Garlic
      • Tastefully Simple Onion Onion
      • a few dashes of dried thyme and dried basil
      • water
      • 1 cup grape tomatoes, halved
      • 4 links pre-cooked chicken or turkey sausage, cut into small slices
      • 4 oz fresh mozzarella, diced
        Directions:
        • For the Parmesan Quinoa Cakes
        • Thoroughly wash quinoa and let sit in a fine mesh sieve to drain.
        • Bring water and pinch of salt to a boil.  Add the washed and drained quinoa.  Bring back to a boil, then cover and simmer 20-30 minutes until quinoa has absorbed all the water.  Remove from heat and let sit, covered, for 5 minutes for any excess water to absorb into the quinoa.
        • Transfer quinoa to a bowl and let cool 10-15 minutes.  Stir in eggs, parmesan and thyme.  (Make sure the quinoa is sufficiently cooled, otherwise the egg may begin to scramble when you add them.)
        • Divide quinoa into 4 equal parts, and using your hands, form each part into individual tightly-packed patties.  Place patties onto a baking sheet sprayed with PAM.
        • Chill patties for 15-30 minutes.  (This is important to let the egg set, otherwise the patty may fall apart on you.)
        • Preheat oven to 375 degrees F.
        • Spray the tops of patties with PAM and bake for 20 minutes, flipping them halfway through.
        • Turn on the broiler and broil for the last minute or two to get a nice brown crust on top.
        • Serve immediately.
        • For the Eggplant and Sausage Ragout
        • Sauté the mushrooms in olive oil for a few minutes until slightly browned.
        • Add in the eggplant, seasonings, thyme and a few tablespoons of water.  Sauté until everything begins to soften.  Add a little bit of water as needed to prevent the mixture from drying out.
        • Add the tomatoes and sausage and continue to cook until the ragout is nice and soft.
        • Sprinkle with mozzarella and toss immediately before serving.
        As with most (or all?) of my recipes, this one is very flexible, and you can add anything you'd like.  The original recipe calls for roasted peppers, which I didn't add because I didn't have any on hand.  But I added the mushrooms and the sausage.  And it would be yummy with artichoke hearts as well, I think.

            Wednesday, March 10, 2010

            Lime Garlic Marinated London Broil

            I normally cook steaks on the grill.  But since it's been raining a lot lately (Egads!  In Southern California?!), the grill is currently waterlogged and so I had to resort to the broiler.  This was my first attempt at broiling a piece of steak, I kept it in a few minutes too long so it turned out med-well instead of my preferred medium or med-rare.  I had it in there for 10 mins per side, next time I'll probably go for 7 or 8 mins per side (I reflected that in my directions below).

            This recipe is pretty subtle.  If you want more kick to your steak, go heavy on the seasoned salt.

            Lime Garlic Marinated London Broil
            I made this one up myself based on what I had in the pantry.


            Ingredients:

            • 1.5 - 2 lb London broil steak, all visible fat removed
            • 1/4 cup Worcestershire sauce
            • 1/4 cup olive oil
            • 1 large lime, juiced
            • 4 cloves of garlic, crushed
            • Tastefully Simple Seasoned Salt
            Directions:
            • Place all ingredients into a zippered plastic bag.  Mush it all around to make sure the steak is well coated.  Refrigerate 12-24 hours, occasionally turning the bag to make sure both sides get marinated.
            • When ready to cook, preheat broiler.  Remove steak from bag and broil until desired doneness (7-8 minutes per side for medium).
            • Remove from broiler and let sit for 15 minutes before thinly slicing against the grain.

            Tuesday, March 9, 2010

            Tomato Braised Pork Chops with Couscous

            I have nothing witty to say today, sorry.  Todd came home late from work, and I need to go study for an OB/GYN test in the morning.  :-)

            Tomato Braised Pork Chops with Couscous
            I made this one up myself based on what I had in the pantry.


            Ingredients:
            • Tastefully Simple Seasoned Salt
            • 4 medium pork chops, all visible fat removed
            • extra virgin olive oil 
            • 1 can (15 oz.) diced tomatoes
            • 1 can (15 oz.) great northern beans, drained (I would have used garbanzo beans but didn't have any on hand)
            • 1 can (15 oz.) artichoke hearts, drained and chopped
            • a few pinches dried rosemary
            • a few pinches dried thyme
            • 1 cup whole wheat couscous, uncooked
            Directions:
            • Sprinkle both sides of pork chops with the Seasoned Salt.
            • In a large skillet on high heat, drizzle a couple tablespoons of olive oil and sear the pork chops on both sides.  Turn the heat down to medium-low.
            • Add the diced tomatoes, beans, artichokes, rosemary and thyme.  Season with some more salt if needed.
            • Cover the skillet and let braise for 45 minutes to an hour.
            • Remove the pork chops onto a cutting board and dice into bite-size pieces.
            • Meanwhile, add 1 cup whole wheat couscous to the skillet and mix to incorporate it into the tomato mixture.
            • Return the diced pork to the skillet, cover and turn off the heat.  Let sit for about 10 minutes until the couscous is nice and fluffy and has absorbed most of the sauce.
            If you want, you could keep the pork chops whole and serve them atop the bed of couscous.  I like to dice them up because it's easier to box up for lunch the next day.

              Monday, March 8, 2010

              Orange Sole

              We love fish at our house. Even the little one eats it. She began eating fish before chicken (and she still doesn't care for beef). Probably because the fish is more tender and chewing it with few teeth wasn't such an issue.

              I love cooking fish because it's quick and easy.  Normally for firmer fish like salmon and tuna, I'll just throw it on the grill.  And I pan fry more tender fish like sole or tilapia, with just a dash of yes, you guessed it, Tastefully Simple Seasoned Salt.  I was looking for a way to kick it up a bit when I came across this recipe.  Luckily for me, Henry's is having a fabulous sale this week: fresh wild Dover sole fillets for $3.99/lb, and huge juicy Navel oranges for $0.15/lb.  Jackpot!

              Orange Sole
              Adapted from this recipe.


              Ingredients:
              • 1 lb sole fillets
              • Tastefully Simple Seasoned Salt
              • freshly ground black pepper
              • PAM
              • Smart Balance
              • a splash of balsamic vinegar
              • 2 navel oranges, peeled and sliced
              • a handful of grape tomatoes, halved
              • thyme
              • dill
              • a handful of toasted pistachios, shelled
               Directions:
              • Sprinkle fillets with the Seasoned Salt and pepper.  In a pan sprayed with PAM, cook the fish a couple minutes on each side until opaque and flaky.  Remove from pan and place on serving plate.
              • Add a couple spoons of Smart Balance, a few splashes of balsamic vinegar, the sectioned oranges, the halved cherry tomatoes, a dash of thyme and a dash of dill to the pan.  Stir with a wooden spoon to loosen the yummy brown bits on the bottom of the pan.  Once the Smart Balance is all melted and the sauce is nice and bubbly, spoon it over the fish.  Sprinkle everything with the pistachios.
              • Serve immediately.
              This recipe also works great with tilapia, red snapper and halibut.  And I bet it would be great with scallops as well (mental note for later).

              Sunday, March 7, 2010

              Crockpot Taco Chicken

              Whenever I think of the crockpot, I conjure up images of drafty cold winter days or damp rainy weekends in my head. Admittedly there are few things better than coming home from a long day of work or school on a cold winter's day (when it gets dark out at 4:00pm) to a warm house filled with savory foody fragrance.

              But considering how easy crockpot cooking is, shouldn't it be used year-round? Get up in the morning, throw everything in the crockpot, and come home in the evening to instant dinner. It's like having your own personal chef cooking for you. Well, almost. Someone needs to invent a crockpot that can cook in multiple sections so you can have an entire 4-course meal waiting for you at the end of the day. ;-)

              I don't remember where I got this recipe from. It's probably a combination of pieces of numerous recipes I've come across over the years, but I've been making this for quite a while now. The beauty of this recipe is that you can add whatever you want to the base, including a bag of frozen peas or corn, different types of beans, diced bell peppers, etc. And instead of using plain canned diced tomatoes, you can used canned tomatoes with peppers, zesty tomatoes, or even RoTel. You also don't have to use chicken, I've made it with pork loin and that's delicious as well. It's also great as leftovers the next day (or even the next week) as the flavors have time to all meld together.

              Crockpot Taco Chicken
              Adapted from I don't remember where.


              Ingredients:
              • 4 boneless skinless chicken breasts, all visible fat removed
              • 2 tablespoons dry taco seasoning
              • several dashes of garlic powder
              • several dashes of onion powder
              • 1/4ish teaspoon salt
              • 1 large can (28 oz) diced tomatoes
              • 1 can (15 oz) black beans
              • half a 4 oz can of diced jalapenos
              Directions:
              • Layer everything into your crockpot in the order listed above. Set on low for 8 hours.
              • After the 8 hours, shred chicken with two forks and mix it all up well. Let sit for 15 minutes before serving so the shredded chicken can soak up all of the yummy goodness.
              • Serve rolled up in warm soft tortillas, stuffed in crusty bread for a sandwich, scooped with Triscuits, or ladled over rice with a dollop of sour cream.

              Tuesday, March 2, 2010

              Creamy Broccoli Goodness

              Ok, so it's really Skillet Broccoli Gratin, but doesn't Creamy Broccoli Goodness sound so much better?

              I've never been a big fan of gratins. Probably because they traditionally contain a lot of fat and a lot of calories, and I've conditioned my brain all these years to avoid those types of foods as much as humanly possible. That's not to say I won't occasionally order it at a restaurant or eat it at a friend's house. I just couldn't justify making it myself. Until now.

              The original recipe calls for cauliflower, but it tastes just as good with broccoli. You could use either, or even a combination of both (must try that next time!) for a more gourmet look.

              Also, when a recipe calls for any type of shredded cheese, please buy a brick and shred it yourself. It only takes a couple of minutes. Why spend the extra time? Well, when's the last time you looked at the ingredients list on the back of a package of pre-shredded cheese? Do you have one handy? If so, take a gander. Yup. That's right. Cellulose. Manufacturers add cellulose to pre-shredded cheese to prevent caking. Some pre-shredded cheese packages also contain antifungals like natamycin to extend shelf life. True, cellulose and natamycin are both natural, and edible, but do you really want to add them to your Creamy Broccoli Goodness? Not me.

              Creamy Broccoli Goodness
              Adapted from this recipe.


              Ingredients:
              • 1 large (and I mean LARGE) head of broccoli, washed and cut into bite-size pieces
              • 2 cups skim milk
              • a few dashes of Tastefully Simple Seasoned Salt
              • a heaping spoonful of whole wheat flour
              • enough skim milk to dissolve the flour into a thin paste
              • 2 large handfuls of shredded sharp 2% cheddar cheese
              • a generous dollop of Dijon mustard
              • a few turns of the pepper grinder
              Directions:
              • In a large skillet, boil the broccoli in the 2 cups skim milk with the Seasoned Salt until tender but still firm. (Be careful not to scald the milk! Best on medium heat, not high.)
              • In a separate bowl, whisk the flour into some milk until a smooth thin paste forms. Add the mixture to the skillet and stir until the sauce thickens.
              • Add the cheese, mustard and pepper and fold gently until all the cheese is melted.
              • Serve immediately.
              You could, of course, add the bread crumbs and broil the entire thing in the oven per the original recipe. Although the crunchiness is a nice juxtaposition (take THAT, low SAT score in high school!) to the creaminess, that extra step is not worth it to me. The Creamy Broccoli Goodness is delicious as it is straight from the stove top, and time spent in the oven is better time spent in my tummy.

              Monday, March 1, 2010

              Eggplant Parmesan Stacks

              I'd bought a beautiful purple eggplant from the local produce stand last week but never got around to cooking it. A couple days ago I sliced it up thinly, salted it and let it sit in a collander for 1/2 hour, then rinsed it off and patted it dry. I was meaning to make eggplant parmesan but never got around to it, so I bagged up the slices and threw them in the fridge. And promptly forgot about them. Until today, when I was rummaging through the bottom drawer of the fridge and found them, slightly brown but still nice and firm. "I wonder if they'd still be good eating," I thought. Indeed, they were delicious.

              By the way,
              I'm a big fan of stacks and rolls and any other individual serving type of construction because it helps me to maintain portion control. It's also easier to divvy up into leftover boxes for lunch the next day.

              Eggplant Parmesan Stacks

              Adapted from
              this recipe.


              Ingredients:
              • 1 large purple eggplant, thinly sliced into rounds (I kept the skin on)
              • salt
              • 2 eggs, whisked
              • 1 part whole wheat panko bread crumbs to 1 part grated parmesan (see? no measurements)
              • Tastefully Simple Seasoned Salt to taste (I love this stuff)
              • PAM
              • 1 jar Trader Joe's Organic Marinara Sauce
              • 1 cup (8 oz) shredded part-skim mozzarella
              Directions:
              • Liberally sprinkle salt over eggplant slices. Place the slices in a collander and let drain for 1/2 hour. Rinse thoroughly with water and pat dry between paper towels. Make sure they're dry!
              • Preheat oven to 350 degrees F.
              • Combine bread crumbs, parmesan and seasoned salt in a large shallow bowl.
              • Dip eggplant slices in whisked eggs, then dredge in bread crumb mixture to coat both sides. Spread slices out, single layer, onto a baking sheet sprayed with PAM.
              • Bake slices for about 7 - 10 minutes, then turn them over and bake another 7 - 10 minutes until nice and golden and crispy on the outside.
              • Eat 2 or 3 slices fresh from the oven and feed a slice to your enthusiastic toddler (blow on it first, it's hot!).
              • In a square 9" baking pan, spread a thin layer of marinara sauce on the bottom. Make 4 stacks, layering eggplant alternately with marinara and mozzarella until you run out of eggplant slices. Top each stack with another spoonful of marinara and sprinkle of mozzarella.
              • Bake 10 minutes until nice and bubbly and golden brown.
              • Serve immediately.
              Todd had to work late tonight, so after everything was done baking, I lowered the oven temp to "warm" and left it in there until he got home (about 1 hour kept on "warm"). The cheese was a little dry on top, but everything else was still delicious. And Todd, who would never voluntarily eat eggplant, devoured one whole stack in less than 5 minutes and exclaimed in between mouthfuls, "you need to save this recipe." True story.